Tag Archives: Deep Sky Imaging

Time Lapse Astrophotography: Capturing Motion in the Sky

Astrophotography has long been a fascinating field, allowing us to capture the beauty and wonder of the night sky. One technique that has gained popularity in recent years is time-lapse astrophotography, which involves taking a series of photographs at regular intervals to create a stunning visual representation of the motion of celestial objects. In this article, we will explore the world of time-lapse astrophotography, its techniques, and the breathtaking results it can produce.

What is Time-Lapse Astrophotography?

Don Smith

Time-lapse astrophotography is a technique that involves taking a series of photographs of the night sky at regular intervals, usually ranging from a few seconds to several minutes. These images are then combined to create a time-lapse video or animation, showcasing the motion of celestial objects such as stars, planets, and galaxies. This technique allows photographers to capture the dynamic movement of the universe, revealing patterns and phenomena that would be difficult to observe with the naked eye. Time-lapse sequences can display star trails, the rotation of the Milky Way, or the transit of planets in a visually captivating way.

Equipment and Techniques

To capture stunning time-lapse astrophotography images, you will need a few essential pieces of equipment:

1. Camera: A DSLR or mirrorless camera is ideal for time-lapse astrophotography because most of them come with an intervalometer built-in. Look for a camera with good low-light performance and the ability to shoot in RAW format. RAW files preserve maximum detail, which is crucial for post-processing.

2. Tripod: A sturdy tripod is essential for keeping your camera stable and preventing camera shake. Stability is critical, especially for long exposure shots.

3. Intervalometer: An intervalometer is a device that allows you to set a specific interval between shots. You can also use a camera’s built-in interval shooting mode or a smartphone app if your camera supports wireless control.

4. Wide-angle lens: A wide-angle lens (between 10-24mm) is ideal for capturing the vast expanse of the night sky. Lenses with a wide aperture (f/2.8 or lower) are particularly useful for gathering more light in low-light conditions.

5. Remote shutter release: A remote shutter release or camera timer helps to prevent camera shake and ensures that your shots are taken at precise intervals.

Techniques for capturing Time Lapses

When it comes to techniques, there are a few key considerations:

  • Shoot in RAW: Shooting in RAW format gives you more flexibility when editing your images. This flexibility is vital when enhancing details, adjusting exposure, or correcting colour balance during post-processing.
  • Use a low ISO: Keep your ISO as low as possible (preferably 800 or lower) to minimise noise and digital artifacts. However, in particularly dark conditions, a higher ISO may be necessary.
  • Focus on infinity: Make sure to focus your lens on infinity to ensure that your stars and other celestial objects are sharp and clear. Many lenses have a focus mark for infinity, but it’s a good idea to fine-tune using your camera’s live view.
  • Golden hour preparation: While time-lapses are typically shot at night, setting up during the golden hour (just before sunset or sunrise) allows you to capture smooth transitions between light and darkness.
  • Shoot for sufficient time: The length of your time-lapse sequence will depend on your subject. For example, capturing star trails may require several hours of continuous shooting, while the motion of planets or meteors might only need an hour.

Tips and Tricks for Better Results

To take your time-lapse astrophotography to the next level, consider the following tips and tricks:

  1. Plan your shoot: Research celestial events you want to capture, such as planetary alignments, meteor showers, or the movement of the Milky Way. Use astronomy apps or websites like Stellarium, SkySafari, or Star Walk to predict the timing and location of these events.
  2. Use a star tracker: A star tracker is a motorised device that compensates for the Earth’s rotation, allowing for sharper images of celestial objects. While star trackers are often used for still astrophotography, they can also enhance time-lapse sequences.
  3. Minimise light pollution: Urban areas with high levels of light pollution can obscure the night sky. Travel to darker locations, such as rural areas or designated dark-sky parks, for clearer views. Light pollution filters can also be helpful.
  4. Experiment with intervals: The interval between shots determines the speed of motion in your time-lapse. Shorter intervals (e.g., 2-5 seconds) work well for fast-moving objects like meteors, while longer intervals (e.g., 20-60 seconds) are better for slower celestial phenomena.
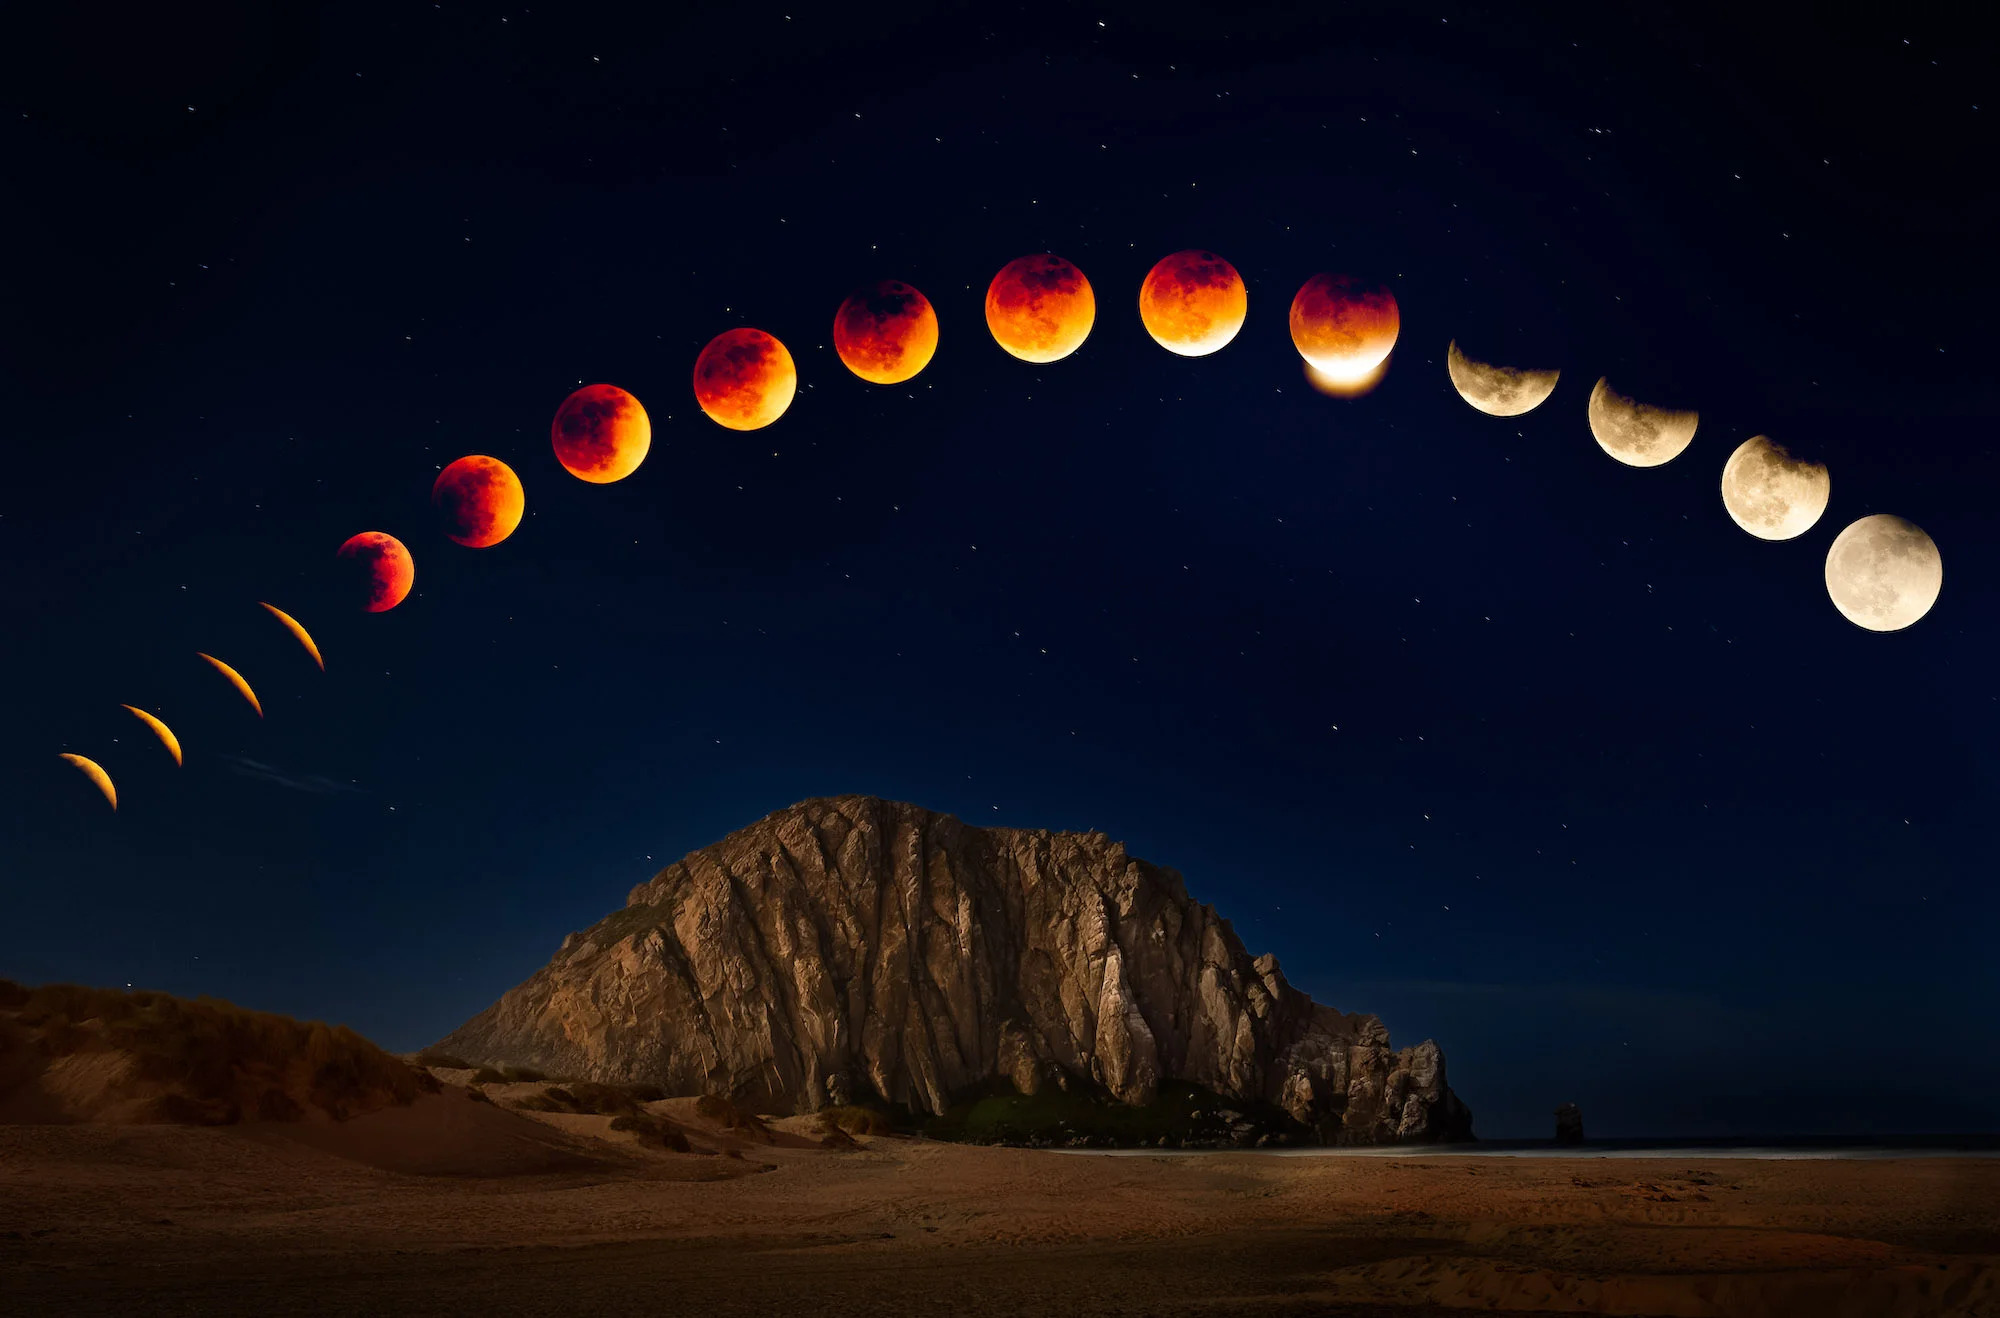
  5. Incorporate foreground elements: Including terrestrial features like mountains, trees, or buildings can add depth and context to your time-lapse, creating a more visually compelling composition.
  6. Backup your data: Time-lapse photography involves capturing hundreds or even thousands of images. Use high-capacity memory cards and ensure you have sufficient storage to avoid interruptions.
  7. Post-processing: Use software like Adobe Lightroom, Photoshop, or specialised time-lapse programmess like LRTimelapse to enhance your images. Adjust exposure, contrast, and colour grading to highlight the beauty of the celestial events.

Examples of Time-Lapse Astrophotography

Time-lapse astrophotography offers endless creative possibilities. Here are some common themes and examples:

  • Star Trails: By keeping your camera stationary, you can capture the circular motion of stars as they revolve around the celestial poles. Star trails reveal the Earth’s rotation in a mesmerising way.
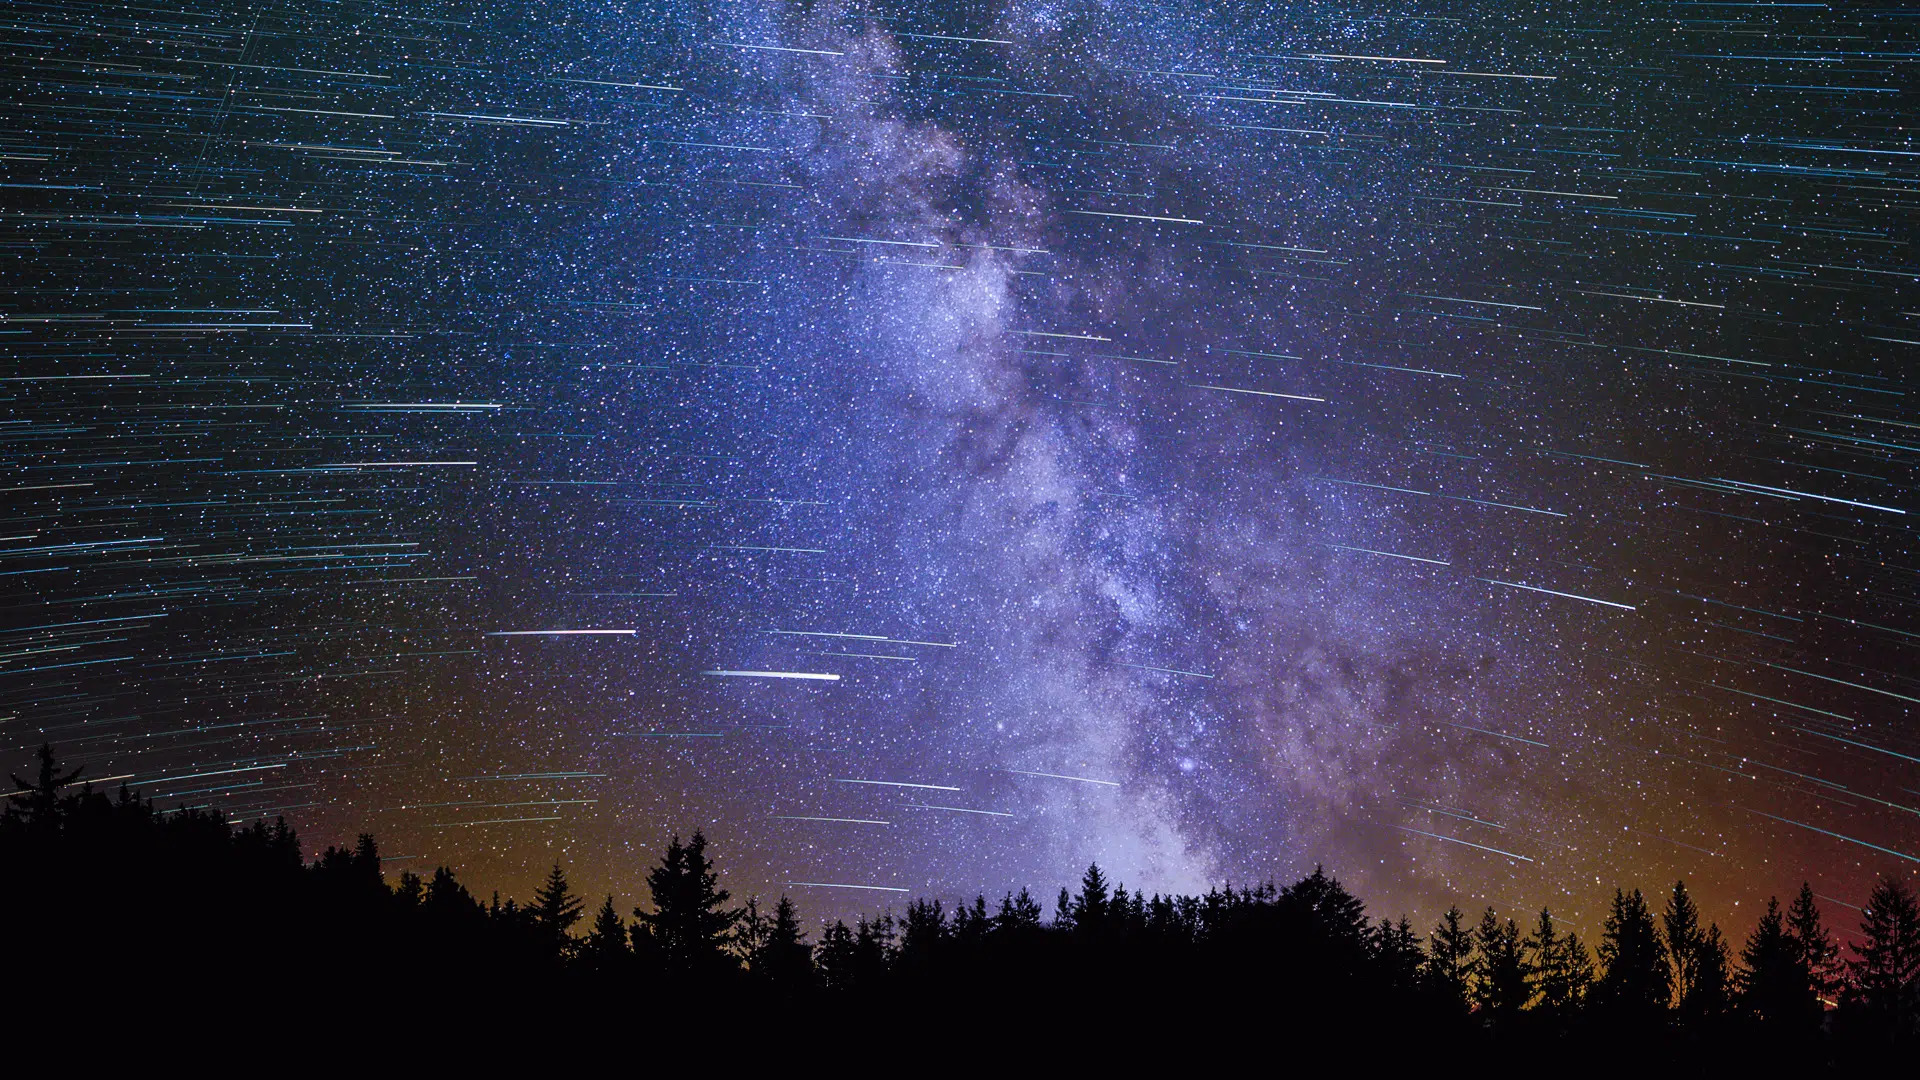
  • Milky Way Motion: Tracking the Milky Way’s movement across the sky creates a sense of grandeur, showcasing its vivid colours and intricate structure.
  • Planetary Transits: Capture the subtle motion of planets like Jupiter and Saturn as they move against the backdrop of stars.
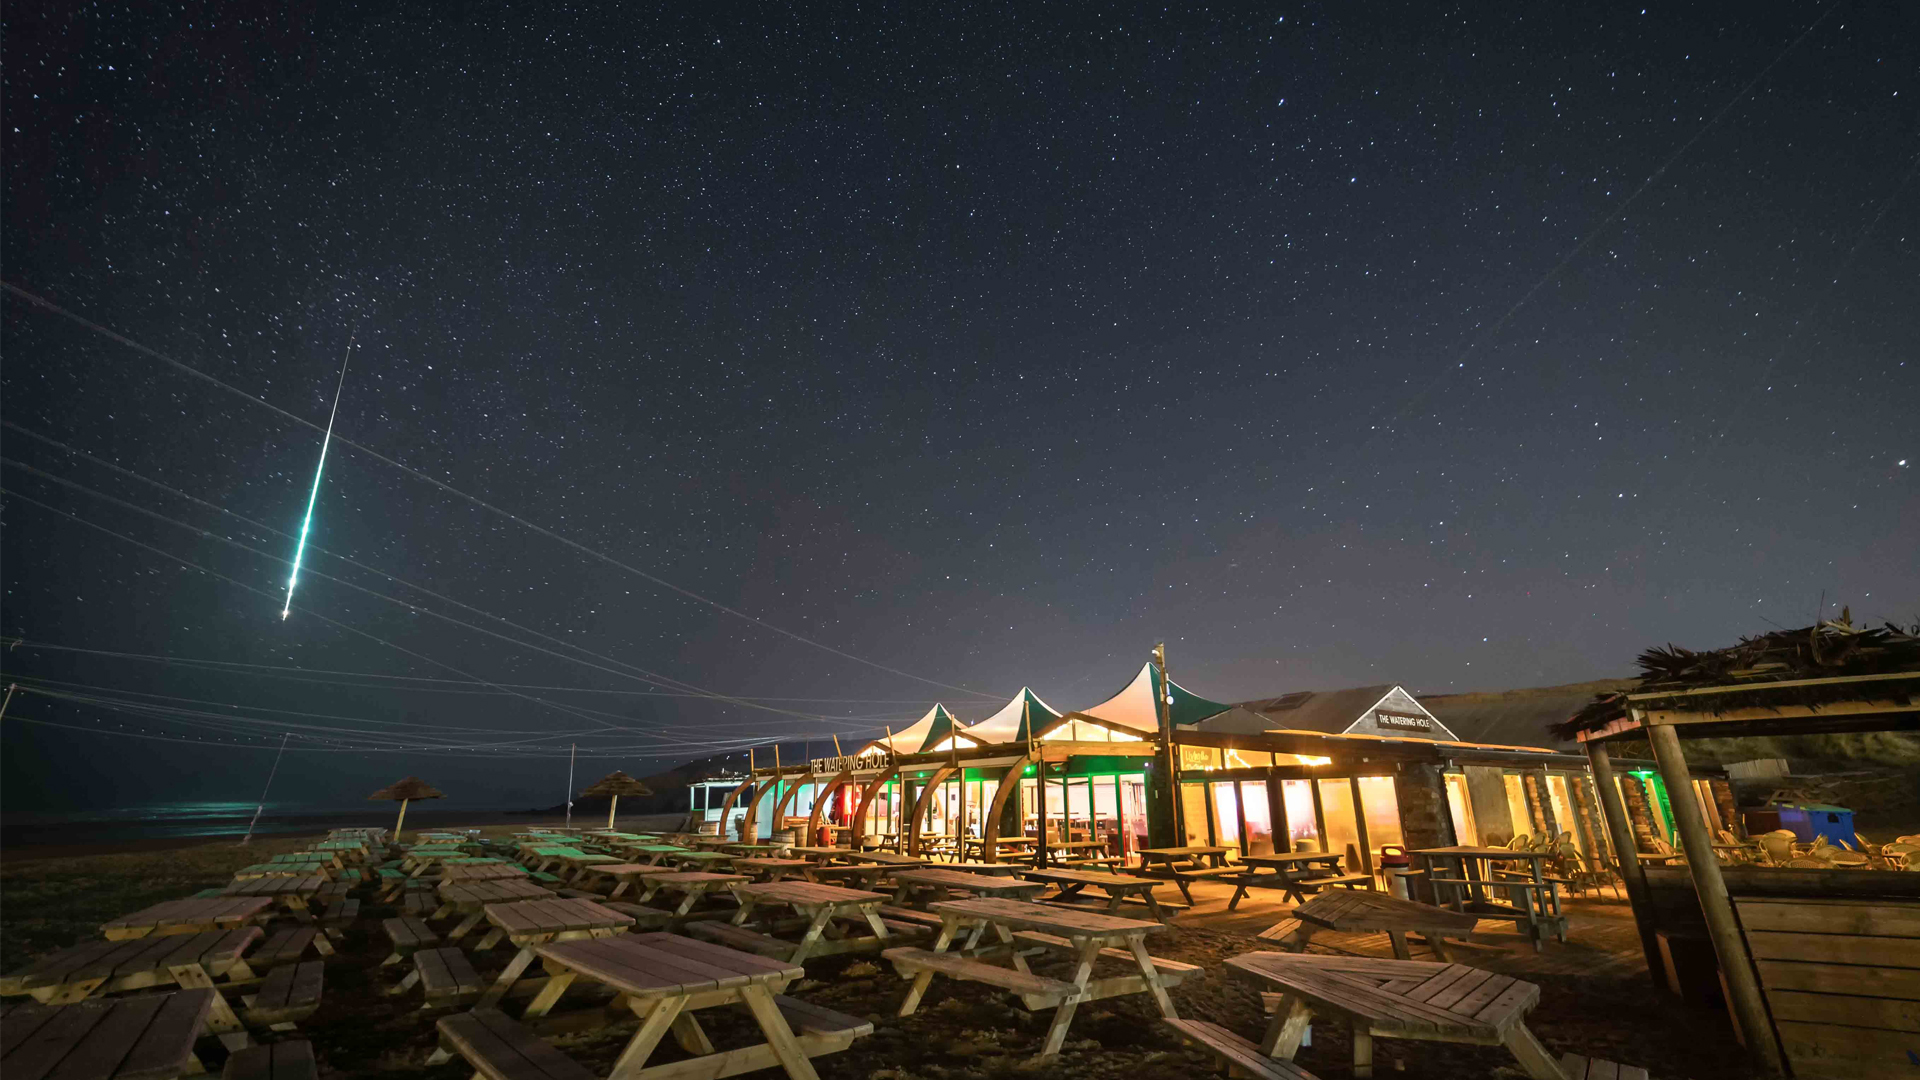
  • Meteor Showers: Events like the Perseids or Geminids provide opportunities to capture streaks of light as meteors burn up in Earth’s atmosphere.
  • Auroras: The northern and southern lights provide an incredible display of shifting colours and shapes, making for dramatic time-lapse sequences.
  • Eclipses: Lunar and solar eclipses, though rare, offer unique opportunities to capture time-lapse sequences of these awe-inspiring events.
Vit Kovalcik

Challenges and How to Overcome Them

Time-lapse astrophotography is not without its challenges, but with preparation, you can overcome these obstacles:

  • Weather: Cloudy or inclement weather can ruin a shoot. Check weather forecasts in advance and have a backup plan.
  • Battery life: Long shoots can drain your camera’s battery. Bring extra batteries or use an external power source to keep your camera running.
  • Lens fogging: In humid conditions, your lens may fog up during the night. Use a lens warmer or anti-fog solutions to prevent this issue.
  • Noise: Long exposures and high ISO settings can introduce noise into your images. Reduce noise during post-processing and consider stacking techniques to improve image quality.

Conclusion

Time-lapse astrophotography is a captivating way to document the beauty and motion of the night sky. With the right equipment, techniques, and planning, you can create stunning sequences that reveal the dynamic nature of our universe. Whether you’re capturing star trails, planetary alignments, or the mesmerising dance of the aurora borealis, time-lapse photography offers endless opportunities for creativity and exploration. So grab your gear, head to a dark-sky location, and let the wonders of the cosmos unfold before your lens.

Cover Photo Credits: NASA JPL

Reaching the Stars – Navaneeth Unnikrishnan

Mastering an awe-inspiring genre like astrophotography is a tough task, one that’s becoming tougher over the years. Navaneeth Unnikrishnan has toiled through it all and is one of the pioneers of the genre today. His pictures don’t only consist of pure astrophotography, they belong to a wide range of genres including landscapes, night landscapes, mobile photography, timelapse and more. Asian Photography spoke to him about gear, passion, time investment, workflows, and more. Excerpts:

How did you get into astrophotography?

I stumbled into astrophotography by chance when I unintentionally captured an image of the Milky Way without realising what it was. My hometown has very minimal light pollution, and one night, while observing the sky from my terrace, I noticed an unusual faint glow. At the time, I had a basic understanding of photography but no understanding of night skies, so I decided to point my camera toward the sky and take a long exposure shot. To my surprise, the image revealed intricate details that were invisible to the naked eye. That moment sparked my fascination with astrophotography, leading me to explore wide-field and deep-sky imaging.

How should one start in astrophotography if they plan to get into it?

With the advancements in camera tech today, one can even begin astrophotography using just a smartphone. Most smartphones, especially flagships, feature a “Pro Mode”, which allows manual control over shutter speed and ISO, along with the ability to capture images in RAW format. This can be a great starting point for beginners. Alternatively, one can invest in a basic mirrorless or DSLR camera equipped with a wide-angle lens (24 mm or below) and a wide aperture (f/2.8 or lower), along with a sturdy tripod. The setup is ideal for basic wide-field astrophotography. However, astrophotography goes beyond this, there are specialised forms such as deep-sky imaging, planetary imaging, lunar and solar imaging. These require dedicated equipment. For example, deep-sky imaging requires the use of a telephoto lens or a telescope mounted on an equatorial mount to compensate for Earth’s rotation and prevent star trailing. A practical step beyond wide-field astrophotography is investing in a portable star tracker, which, while limited to tracking wide focal lengths, can significantly step up your wide-field images. However, one of the biggest challenges remains access to pristine dark skies, something that is increasingly tough to find in India due to light pollution.

Shot on a mobile

Does Astrophotography need a lot of patience?

Yes, astrophotography demands a great deal of patience, especially when it involves travelling to remote locations with pristine night skies, and enduring harsh conditions like extreme cold during night time sessions.

There are several forms of astrophotography. Among them, wide-field imaging is one of the most accessible and requires comparatively less patience. However, other forms, such as deep-sky imaging and planetary imaging, require a good deal of dedication. The process involves setting up heavy equipment, troubleshooting technical issues, and dealing with unexpected software errors – sometimes in the middle of imaging sessions! These challenges can test one’s patience, but are ultimately rewarding.

What are the most challenging things about Astrophotography?

Astrophotography can be challenging, and at times, even frustrating, when despite all efforts, you may return without a single usable image. There have been instances where I have travelled for days to reach a remote location, endured extreme cold, and stayed there for weeks, only to be met with consistently overcast skies. This is a reality that anyone involved in astrophotography for a while is bound to face.

Unfortunately, weather forecasting in India is not as reliable making it difficult to plan imaging sessions with certainty. Beyond weather related challenges, deep-sky imaging presents its own set of difficulties, such as tracking inaccuracies, software glitches, light pollution, poor atmospheric conditions, and issues with telescope collimation. Each of these factors can impact the imaging process, making astrophotography a pursuit that demands persistence, adaptability, and a deep passion for the craft.

What are your favourite things to shoot and why?

My favourite subject to photograph is the Milky Way. Despite capturing it countless times, I am still captivated by its beauty, the intricate dust lanes, the vibrant Rho Ophiuchi cloud complex, and the subtle H-alpha emissions that weave through the galactic core. 

However, for me, photographing the Milky Way goes beyond just capturing an image. It carries a deeper, almost philosophical significance. It is a reminder that we are part of something vast, our home galaxy, stretching across the cosmos. It evokes thoughts about our place in the universe, the immensity of space, and the connection to the past, as the light we capture has travelled for thousands of years. It also sparks existential questions about time, history, and the fleeting nature of human existence in the grand cosmic timeline. Astrophotography, to me, is not just about the technical process, it’s a bridge between science, art, and introspection.

What equipment and lenses do you use for Astro, and how are they different from regular gear? 

My astrophotography setup is a combination of standard photography gear and specialised astro equipment. Each piece serves a distinct purpose, from wide-field landscapes to deep-space imaging and solar observation.

My go-to gears for wide field and aurora images are Sony A1, Sony A7s Astro-Modded, along with a couple lenses like Sony 14mm F/1.8, Sony 20mm f/1.8, Sony 16-35mm F/2.8, Sony 50mm f/1.2. I love the noise performance and sharpness of the lens offered by these gears and has never failed me in extreme conditions. 

For deep-space objects like nebulae, galaxies, and planetary imaging, I use dedicated cameras like ZWO ASI294MM Pro (a monochrome camera optimised for astrophotography) with Narrowband filters from Optolong to capture specific wavelengths of light, this includes Red, Green, Blue, Luminance, H-Alpha, Oxygen III, Sulfur II, a Celestron EdgeHD 8″ Telescope giving me 2032 mm focal length. I use these for distant nebulas, galaxies, planets and lunar imaging. I also use a Redcat 51 Telescope for wide field images. 

For observing and photographing the Sun, I use a dedicated solar telescope designed specifically for hydrogen-alpha (Hα) light. Unlike regular telescopes, this instrument isolates a narrow wavelength of red light emitted by hydrogen atoms, revealing solar prominences, filaments, flares, and dynamic surface activity, features that would be invisible in standard white-light observations.

This is coupled with a ZWO AM5 Tracking mount. These setups allow for long-exposure imaging and tracking celestial objects with precision.

Specialised equipment significantly improves image quality, detail, and the ability to capture astronomical phenomena beyond what the naked eye can see.

What is the most underrated aspect of Astro, be it equipment, or a ritualistic practice, or a software workflow?

The Art of Astrophotography is something I would consider underrated. While technical expertise is crucial, astrophotography is equally an art form. Composition, framing, and creative processing play a vital role in shaping the final image, transforming a technically accurate capture into something truly mesmerising and unique. 

In your opinion, is there a perfect astro image? 

No, in my view there is no single, universally “perfect” astro image. Perfection in astrophotography is subjective and multifaceted, much like art itself. What one person considers ideal, another might see differently. 

Subjective – The perception of beauty varies from person to person. Some may be drawn to vibrant colours and intricate details, while others prefer a minimalist and evocative approach. There is no absolute standard for what makes an astro photo “beautiful”; it is deeply personal and open to interpretation.

Technical vs Artistic Perfection – An image may be technically flawless, sharp focus, minimal noise, and excellent dynamic range, yet lack artistic impact. On the other hand, an image with minor technical imperfections can still be compelling due to its composition, emotional resonance, or unique perspective. 

Astrophotography is constantly advancing. What was considered a “perfect” image ten years ago has now been surpassed by newer techniques and improved equipment. As camera technology and imaging gears progresses, so does our perception of what constitutes the best possible image. 

Each astrophotographer approaches the craft with different priorities. Some focus on scientific accuracy, capturing celestial objects with precision, while others emphasise artistic interpretation. The idea of a “perfect” image is ultimately shaped by an individual’s goals, vision, and personal style.

What does “Astro Modding” a camera mean, and could you tell us about the process?

Astro Modding is basically modifying your camera by removing a certain filter to enhance its sensitivity to specific wavelengths of light which is Hydrogen-Alpha emission, this wavelength of light is found in nebulae. Normal DSLR and mirrorless cameras have a filter that blocks some light. This filter is good for regular pictures, but it makes it hard to see the beautiful red and pink colours of nebulae. Doing this helps with capturing more detail in emission nebulae and other Hα-rich objects. Allowing better signal collection (as the filter removed does cut some light). The downside of modding your camera is it voids your camera warranty. So I prefer doing it on an old, used camera. 

It’s a lengthy process and would require good technical knowledge. Hence, I would advise you to modify it from reputable “modders”. Once the basic modification is done, it would not work well under normal daylight conditions unless you add a white-balance fix or correct it using IR/UV cut filters.