Smartphone cameras have improved a lot from beginner to professional in past 5 years, with companies pumping up the resolution, adding more lenses, and providing photo storage options that lets you snap without fear of storage getting full. Look for accounts on Instagram who is doing phone photography and you’ll soon observe that the images shot using a mobile these days are giving tough competition to cameras. If you have a smartphone with great camera, you should definitely step up your photography game. So here are some tips and tricks, along with some phone photography gear recommendations, that will take your snapshot game from amateur to professional.
First, start with a clean slate
Before you capture a single image, you have to make sure your phone is in order. Often, that means do a pre-shot cleaning. That’s the first rule for any phone photographer. While wiping your lens on your t-shirt might do the job, using harsh materials, like a shirt, or a handkerchief dipped in water, may end up harm your phone lens after a certain time. If you like to keep scratch free, use a softer cloth like a microfiber cloth which is used for cleaning spectacles or sunglasses to get rid of any smudges off your phone camera lens.
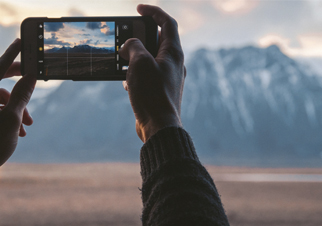
A little framing goes a long way
Framing shots needs a creative head, but that doesn’t mean you have to do everything up all by yourself. Fortunately, you can take help from your camera to assist you when it comes to framing and composing your images.
In iOS, go to Settings and click on Camera. From there, turn the “Grid” to position a rule-of-thirds overlay in the phone camera. That grid will assist you to compose your photo more perfectly, and it will also help you to keep the image parallel with any vertical or horizontal lines in your shot. On Android devices, go to Settings > Apps > Camera, and turn on “Grid Lines”.
Framing is one part of composing the picture itself and so always make sure you’re not including any distracted subjects while capturing. It is suggested to make sure that everything in the frame is there because you want to include that part in frame.
Ditch the digital zoom
Every photographer loves to get a closer look at that subject. But zooming in before you capture the image is not the perfect way to get close. Digital zoom photos are just cropped and re-sized photos, unlike the optical zoom which you can find on good cameras. Digital zoom will not only give a noisy picture, it will also cut down the resolution of the overall picture and show up any vibrations from your hands while capturing, leaving you with an bad image of your beautiful subject. It is highly suggested to avoid digital zoom as often as possible but go for the telephoto lens on your smartphone, if it has one or you can buy a external good quality telephoto lens from Amazon.
Look for light before using flash
The flash of an LED light from a smartphone is not really great to provide good images to flatter anyone, no matter how beautiful you look or how well you are posing. And that blazing light comes from a single source will make your picture look harsh, odd-coloured compared to the image shot on natural light.
Rather of depending on an smartphone flashlight to decently light up your subject, search for other light source you can use, be it the falling sun, some indoor lights, or even some candle light if you want to get creative images. If you are really at a loss for external light, you can always go for a external LED or another smartphone’s flashlight mode to give a better light outcome on the subject.
Watch out for cloud storage
Cloud storage services, like Google Photos or iCloud, can be a perfect way to capture thousand of photos without stressing over the space left on your device. But some of these storage don’t automatically uploads the highest resolution version of your pictures. If you capture lots of images then you will have to pay a monthly fee to back up all your high-resolution pictures. A cloud-based backup service is actually one of the best investments you can make as a phone photographer.
If you’re ready to loose the photo quality for increased storage space, then feel free to store only low-resolution images to the cloud. But if you want to keep every images in high-resolution, or prize photo quality above everything then storing images in their original format and paying the premium of a few hundred each month will totally be worth it.
Use a tripod or Steady yourself
If your images of the city skyline look a little shaky, or your photos during sunset seem a bit blur, you should learn about the photographer’s most helpful tool: the tripod. A good tripod is necessary, but for smartphone photographers it is not that important. Well, a steady hand is anytime better than a shaky hand, but none of them can beat the tripod’s skills. It provides you an impressive range of new types of photography styles like low light, long exposure, light painting, long exposure and many many other types. Small gorilla tripods are suitable for smartphone photography and easy to carry and you can use it with almost any phone.
Go remote with a shutter button
If you don’t like setting a timer and running into your frame and still get bad images most of the times then you really require a remote shutter. Remote shutter is an perfect accessory for capturing photos that requires a more steady hand, or any self-portraits. Tapping the click button while capturing, no matter how cautious you are, it will cause little vibrations that will affect your results. Smartphones like Samsung’s Galaxy Note series comes with a stylus pen that works remote shutter button, and can be kept in your hand or pocket when you’re ready to capture the image. Also for other phones remote shutters are small, cheap, and can connect to any smartphone via Bluetooth.
Or speak to Google on your Android phone to capture a image
Since all the android smartphone’s are already constantly hearing, waiting for someone to give a order, why not use it take selfies or photos too. On Android smartphones, you can ask Google Assistant to capture a image or selfie or timed photo and watch your smartphone open the camera app and capture the image on its own. Smartphones like Google’s Pixel can automatically detect the perfect moment for a image, be it a cute smile or a funny face, its AI-powered face detection features like Photobooth and Top Shot. Sadly on iOS, Siri will open the camera for you, though you will have to capture the image by yourself.
Experiment with exposure
Exposure can kill or cure any image, and the difference between them is wither you will showcase a subject in all their glory, or end up with a image that leaves them looking like dark shadow of their real self. Before capturing always tap on the screen to lock the focus on the subject you’re capturing. This is really useful when capturing people against the light or skies. It results in well lit images. Of course, if that’s the creative look like silhouettes or over exposed look you’re planning to capture the its a different thing.
Portrait Mode works better when there’s light
Using any smartphone’s “portrait mode”, which imitate the shallow depth of field found in images shot on cameras, will give you a more visually appealing image. This mode is amazing for taking portraits of people or when the background is cluttered. While everyone loves the look of a image from an good camera, but relying on the portrait mode too much can hurt more than it helps, especially if your surrounding isn’t well lit. Though there are some phones which work somewhat better in low light portrait mode but still can’t beat a camera.
