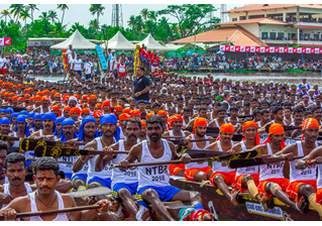
Author Archives: Administrator

Fire up your creativity

There is more to being a photographer than simply being able to handle the camera. One of the important factors required includes creativity. Being a photographer, it is important that you always think creatively. But the flow of creativity might sometimes become weak or altogether stagnant. In such times, you need to fire up your creativity in any way possible. In this article we will list some of the ways that you can light a spark to your creativity that might be rusting. We will list out some project ideas that you can undertake. 

Restrictions 


Do a project or shoot by creating random restrictions to your shooting. Some of these limits can include using only a prime lens, shooting images with negative space, ensuring there are no people or structures in the frame, using only manual mode, shooting only b/w, over or underexposing your images, spot meter only etc. You can make these rules up. Once you start shooting with a restriction, you will realise how it is not the easiest task. However, it will force you to think creatively and improve your photography. 

Shoot with a film camera 
Go back to the roots and grab a film camera and shoot a roll of film. When you start shooting with a film camera, you will realise that unlike the DSLR, you cannot simply fire the camera and click endless shots. The film camera will have a limit of images, so you will be forced to carefully analyse your shots before shooting. You will have to think of composition, camera settings, light etc. This exercise is definitely a great way to get you to think before shooting. Once you get the film processed, you will get the actual prints of your photos, and you can accordingly critique the shots. 

Shoot 10 images of a small subject 


Select one specific subject and then give yourself a number, it could be 5, 10 or 15, and shoot these many images of that same subject. This exercise will make you think about the various different ways that you could capture the same subject. Make you think of composition, angles, lighting etc. However, make sure that the small subject does not mean your whole city! 

Shoot elements in same location 


Think of different photographic elements like shape, form, pattern, texture, light, shadow, depth etc, and then go to a specific location and try to capture images that would feature these images. This little exercise will increase your observational skill, and make you think of different creative ways of shooting. 

Capture the alphabets 
This exercise is a tricky one, and there are two ways that you could do it. Go out and shoot the 26 letters from A-Z. While you can either go shoot images of things that would appear like the alphabet (for example a round manhole for the letter ‘O’, or else you can go and shoot objects or actions that start with that alphabet. If you are doing the first task, then do not shoot actual letters out there, and if you’re doing the second task, make sure you shoot images which clearly depict the action. 

Single theme 
This would probably be an easy project, but nevertheless can be very creatively fulfilling. Give yourself a single theme or a topic. This can be anything, from colourful window panes or vintage cars to street cats or babies. You are free to choose any theme you like and then you can go out and find these subjects and shoot them in an interesting way possible. You will start relating to the subject and discover much more about it. 

A day in the life 


One of our favourite photography projects to undertake is this one. Find an interesting subject; this can be a policemen, your local tea-seller, the gardener, or simply your grandmother, and then accompany them around the entire day shoot them the entire day. Your images should capture the essence of the person’s day, and give the viewer a humanistic in-depth look into the person and their daily-life. 

Middle of the day 


One of most common excuses photographers give to not go out and shoot is “it’s the middle of the day, there’s bad lighting”. With this exercise you will be forced to step out in the middle of the day in “bad lighting” and shoot images. For a week or a month, everyday, go out in the afternoon, and shoot. At the end of this exercise you will realise that you have actually learned how to click images in such lighting conditions. 

Same subject, different times of the day 


Another very creatively fulfilling exercise, shooting the same subject at different times of the day is a great exercise in lighting. The easiest way to do this is to select landmarks, or historical buildings in your city, and then shoot them at different times of the day. You can then compare the different images, and you will see how light affects subjects, and how you can tackle it using different settings. 

Self portrait 
While today selfies are very common, these are not necessarily self-portraits. Shooting a self-portrait will involve a lot of thought and planning. While you can simply put the camera on a tripod on a timer and capture yourself, that would be too easy to do. Plan a self-portrait that tells a story. A self-portrait that speaks about who you are, gives an essence of your personality.

Tips for Shooting Music Concert

Photographing live music concerts can be very exciting. While it looks exciting, it is one of the most challenging fields in photography. Imagine your favourite artist is performing in front of you and you get the chance to click his or her photographs. However, with uncontrolled environment, uncontrolled lighting that is constantly changing. On top of that, there are hundreds and thousands of people who paid money to enjoy the event and they are not at all bothered that they are coming in your frame. Also, what equipments do you needs to shoot the music concert? In this article we are giving some basic tips on how to shoot your first music concert, and what camera settings and equipment you require to get the desired result. 

Getting started


The ideal way to get started into music concert photography is to begin with shooting in small clubs because in such venues you can easily get access to shoot the photographs without any press identity proof. So that’s why these are the best locations to experiment with your camera settings and getting used to being in front of the stage. If you have some of your friends who play in a band, you can ask them for their photo shoot to be done by you. Of course they would be more than happy to have pictures of their concerts. But the problems with such venues are the lack of light on stage. So the musicians look so horrible in such light. And because of such low light it is very difficult to get the sharp photos. So what will be the solution for this? 

Buy a fast and cheap prime lens 


Fast and prime lenses are the ideal solution for the above mentioned problem. In low light situation to get the sharper shots, using the fast and prime lens is the only solution unless your camera can support the higher ISO sensitivity without giving much noise. But as a beginner we would recommend you the 50mm F/1.8 prime lens because of its ability to shoot in low light at its lowest aperture. You can also use flash in low light situation but using direct flash can ruin the effect. 

Getting the correct exposure 


One of the major things in photography is getting the correct exposure by measuring the amount of light. And during the live music concerts there are several sets of repetitive light. You should keep in mind the correct parameters for the different lights. You should always check your histogram and check for the overexposed points to ensure that your main subject is exposed properly. One of the worst things is to get back home with a picture that looks good on your camera screen but on your computer it looks overexposed or underexposed. So we recommend you to shoot in Raw so that you can compensate for the exposure if necessary. 

Get the best results out from ISO 


Increasing the ISO can cause noise, but it is better to take a bit noisy photos sometimes than missing the action totally or taking blurry photos. You can also reduce the noise later with some image editing software. Converting photo into black and white can be a better option for noisy photos. 

Choose the ideal settings and shooting mode 


Choosing the right shooting mode depends on every individual, so you can choose whatever fits to your style. But still shooting on aperture priority mode (AV) and keeping the aperture value as low as possible (ex. F/1.8 or F/2.8 depending on your lens) will be ideal and fast. Some people also shoot in manual mode. Shoot on burst mode so that you will get variety of action shots rather than shooting on single shot. Also keep your metering mode on spot metering because the stage lighting always keeps changing and you will never know if the light will hit the artist’s face in the next second or not. Keep extra empty memory cards with you always. 

Get creative with spotlights and silhouettes 


Sometimes when it’s too dark and you are so far from the stage and you can’t use the flash also from that distance, in such situation you can wait for the spotlight to fall on the artist. You might get very interesting results with those dark images that are lit just by the spotlight. It is actually looks better than the frame where everything is lit. Also when there is lighting changing rapidly in a usually dark place, we will recommend you to try for shooting silhouettes. Choose the silhouette that is very clear so that viewer can see and understand what the subject in the frame is even if it’s without light. These kinds of photos you can shoot when there is no light on subject and the only lights are the ones behind the band or the subject. 

Composition 


Now that we have discussed all the technical issues to photograph a concert, we must not forget to discuss the composition as well. In concerts, it is not likely that every photo will be technically perfect, but you should capture the story and a good interesting composition. Sometimes it could be just a close up of an artist’s facial expression, or just the guitar, or sometimes whole band. It all depends on your artistic vision and equipment constraints. 

Conclusion 
Concert photography is fun and exciting though it is not easy at all. The key to success is a lot of practice before you go to shoot a big concert. Try various tricks to help you if you cannot take a sharp photo at first. It can be hard to look around during the concert, but keep your eyes always open and camera ready.

The wait is over: Canon has officially announced the long-awaited EOS 5D Mark IV

The wait is finally over, as Canon today announced the highly-anticipated EOS 5D Mark IV DSLR camera, the next generation of the popular 5D series of Canon professional DSLR cameras. Building on its celebrated legacy, the EOS 5D Mark IV is set to propel the series forward with features and enhancements targeted to please even the most discerning creative eyes.  The new power-packed camera features a 30.4 megapixel Dual Pixel Canon CMOS sensor, with the DIGIC 6+ Image Processor, delivering 4K 30P video and up to seven frames per second (fps) continuous shooting. 


Earlier this month, we had a chance to meet the Canon team to get an exclusive hands-on with a prototype of the new camera. The Canon team informed us that the new 30.4 Megapixel full-frame CMOS sensor in the camera allows for versatile shooting in nearly any light, with ISO range 100–32,000; expandable up to 50–102,400. The camera features 4K Motion JPEG video (DCI cinema-type 4096 x 2160) at 30p or 24p; in-camera still frame grab of 4K 8.8-Megapixel images; the multiple video options include Full HD up to 60p, and HD up to 120p.


They informed that the Dual Pixel CMOS AF facilitates for responsive and smooth AF during video or Live View shooting; LCD monitor has full touch-screen interface, including selection of AF area. The AF area has 61 AF points, and 41 cross-points. The AF area has also been extended, with Block at center Approx. 8.6 vertically extended, and 24% vertically on side blocks. The camera also features the new Dual Pixel RAW format (a special version of RAW image data that contains Dual Pixel information sent from picture elements (pixels). If the image-recording quality mode is set to DPRAW, this new data format supports development of the photo through the Digital Photo Professional application), in-camera Digital Lens Optimizer during JPEG shooting and Diffraction Correction technologies. There is also inbuilt WiFi and NFC for sharing of images to compatible devices or social media sites.


“Canon’s EOS 5D series of DSLR cameras has a history of being at the forefront of still and video innovation. And today, we add to this family of cameras the EOS 5D Mark IV– the first in our 5D series to offer 4K video and built-in Wi-Fi and NFC connectivity,” said Yuichi Ishizuka, president and COO, Canon U.S.A.. “In developing this new DSLR camera, we listened to the requests of current EOS users to create for them a modern, versatile camera designed to help them create and share beautiful still and video imagery.”

The Canon EOS 5D Mark IV DSLR is currently scheduled to be available in early September 2016 for an estimated retail price of $3,499.00 for the body only. It will also be sold as part of body-and-lens kits with the EF24-70mm f/4L lens ($4,399.00, scheduled to be available early September)  and the EF24-105mm f/4L IS II USM lens ($4,599.00, scheduled to be available late October) .

In addition, Canon is also introducing two new L-series EF lenses – the Canon EF 16-35mm f/2.8L III USM Ultra-Wide Zoom Lens and EF 24-105mm f/4L IS II USM Standard Zoom Lens, with the former scheduled to be available late in October for an estimated retail price of $2,199.00, and the later scheduled to be available in late October for an estimated retail price of $1,099.00.

Canon aims to boost women employee numbers from a present 12% to 20% by 2018

Canon takes forward their legacy of commitment to the country with dedicated efforts to boost women employee, nurture them and help them grow within the system and the company reports state that they aim to boost women employee numbers from a present 12% to 20% by 2018. With strong professional and social ethos, Canon proactively indulges in policies and activities that ensure a safe, secure and inspirational workspace for women.
 
According to Canon, with dedicated efforts to support performance management, employee-management relations and resource planning, Canon HR policies offer an array of solutions. One such unique initiative, ‘Ladies Power Lunch with CEO’ is a platform where women employees are provided an opportunity to interact with the CEO of the company. Under its HR practice, women employees of Canon are motivated to engage and evolve through various company activities. One such campaign is ‘Women Empowerment’ where women from various Canon offices go to the adopted villages under their flagship initiative ‘Adopt a Village’ to interact with women and girls of the villages. Canon employees educate the village females about topics like personal hygiene, significance of sanitation, ways to judge people and situations and most importantly self-defence and safety.
 
The company also reported that to celebrate the spirit of womanhood, Canon India has planned an array of activities to acknowledge and respect the efforts of its women employees. March 8, 2016, International Woman’s Day will welcome women colleagues in the company with a motivational program in which a special session only for women employees will be conducted by a motivational speaker and a Life Coach. During the course of this program, Canon’s women employees will be encouraged to develop a positive attitude towards life. In this two hour long session, they will get the opportunity to interact with the speaker to understand and explore the methods to strike a work-life balance.
 
The company also stated in their reports that on March 13th, photography workshops will be organised across the country. The first leg will witness workshops at India Habitat Centre in New Delhi, The Chancery Pavilion in Bangalore, Holiday Inn in Mumbai and The Park in Kolkata. Highlighting Canon’s commitment towards making technology accessible, particularly to women. 
 
According to Canon, comfort, security, equality, work life balance and evolvement are key aspects of Canon’s HR policies for women. Comfortable work hours, flexible timings for new mothers, transport facility for all employees, relaxed leave policies and much more stand testimony to Canon India’s efforts to promote a culture of growth and gender equality. Reportedly Canon also organizes special workshops like wellness workshop and self –defence training for is female employees on regular basis which helps them to optimize personal well-being to learn effective techniques to counter any form of abuse.The women at Canon are considered pillars of power, who enable the brand to achieve its market position. With the vision to offer the most gratifying yet productive and dynamic environment, Canon continues to support the emergence and success of women power. 
 

Hasselblad announces X1D – The world’s first compact mirrorless digital medium format camera

Hasselblad introduces the groundbreaking X1D compact mirrorless medium format camera – weighing less than half that of a conventional digital medium format camera, the mirrorless 50MP camera is a game changer in the world of photography.
Inspired by the brand’s iconic design heritage, the camera is said to be ergonomic and compact, offering a handling experience unlike any other, the X1D combines Scandinavian sensibility with beautiful performance.
Like the iconic V System, the X1D combines portability with optical quality for which the brand is renowned. Hasselblad has introduced mirrorless technology to digital medium format for the first time ever, creating a camera that can sit in the palm of your hand. The 50MP CMOS sensor primises to captures the finest details with true natural colors.
Perry Oosting, Hasselblad CEO noted, “The X1D marks a pivotal point in Hasselblad’s rich 75-year history. This camera makes medium format photography available to a new generation of Hasselblad users, while pushing the existing limits of photography to new heights.”
A completely new family of dedicated autofocus lenses has been developed to support optical quality and portability, offering a wide range of shutter speeds and full flash synchronisation up to 1/2000th second.
Weighing 725g and including HD video, Wi-Fi and built-in GPS, the X1D is aimed to be an ideal travel companion. The exterior is dust and weather proof, providing durability to take with you wherever you go.
The company informed that the X1D has been created with passionate photographers in mind, opening up Hasselblad to a new generation of creatives. Ideal for those who want to create the highest quality medium format images with a straightforward and easy to use camera that can fit in the palm of your hand.
The Hasselblad X1D is priced at 7,900 EUR / 8,995 USD / 5,990 GBP 
Prices stated are exclusive of VAT.


Shooting at Twilight

pexels.com ©

Twilight is known as the magic hour for the photographer. Each day during twilight one can get stunning photographs because of the lighting conditions at that time. Light is the key to get a beautiful landscape. But that doesn’t mean that you need the sun to be shining always. It’s true that lighting conditions during twilight hours produce stunning light. By shooting before the sunrise and after the sunset one can give a different look to their photographs than the normal sunlight images. With the sun below the horizon and the scene is lit by the light which is reflected from the whole sky. So you will get much soft and diffuse light. In this article we are giving you some tips and techniques that will allow you to make the most of the twilight hours.

When to shoot:
The twilight hours happen each day before the sun rises and after the sun sets. This specific period of time produce a warm glowing light where there is neither daylight nor darkness. Twilight photography is all about waiting until the sun has set or shoot before the sun rises. You need to check the timings of the sunrise and sunset before you plan your shoot. Along with the timings the other important factor for twilight photography is the weather condition. Clear sky with few clouds are the best condition to shoot.

static.pexels.com ©

Plan your shoot properly:
The time gap to shoot during twilight is so narrow that you don’t get much time to shoot. So it’s very important to be prepared before the shoot. Look for location and set your angle before the twilight hour starts. Get to know your surroundings. Make the most use of the available light.

Get your camera settings right:
While shooting during twilight you must shoot in manual mode to make the most of the available light. A sturdy tripod is must as you will need to shoot at a very slow shutter speed depending on the conditions. If you are shooting landscapes and required to focus the whole scene with lot of depth you will need aperture around F/11 or above. Use the ISO accordingly, keeping as low as possible to reduce noise. Shoot in RAW format. Even though you can adjust your white balance while you process a raw file. Choosing the right white balance in camera will help you to visualise the final result. For cool, blue results try using daylight or tungsten preset, and if you want a warmer tone then use shade or cloudy preset.


Use a Graduated ND filter:
Though the sun is below the horizon, there will be still a big difference between the brightness of the sky and the land. If you are shooting towards the rising sun or setting sun you will need a very strong Graduated ND filter such as 3 stop. But if you are shooting away from the rising or setting sun then 1 or 2 stop graduated ND filter will be enough. If you don’t have a graduated ND filter then you can shoot two images instead of one. In first image, set the exposure to get the details in the sky and in second shot set the exposure to get the details in the foreground. Then combine these two images together in Photoshop to get the final result.

Get some urban shots:
Twilight not only benefits for shooting landscapes but you can also get some great city and urban shots. Try working in amongst the architecture before the sun has set. The low sun will cast ambient light over the buildings and can create some really dramatic scenes alongside the shadows. Later in the evening, as the sun sets, try to find a vantage point to get a cityscape shot. The fading ambient light and glowing artificial lights will offer the perfect city scene to capture with a long exposure shot.

wikipedia.org ©

Try Silhouettes:
With the sun is setting, it’s not always possible to light the subject properly but in such cases you can try and take some silhouettes. Look out for opportunities to work with interesting shapes. It is important to use the available light as the backdrop of your silhouette to enhance the form. 


Conclusion:
Hopefully, now you have got a proper idea about the camera settings and the ideal time to shoot in twilight. It’s best to head out on a clear day to start with. Try experimenting with long exposure and silhouettes. Be patient and keep shooting. Don’t be tempted to leave the shoot too early. Shoot as long as you can till it’s completely dark.  

Tips for infrared photography

Infrared light isn’t visible to the human eye but it produces beautiful, ethereal images that couldn’t be captured in any other way. The light spectrum has colour hues from violet through blue, followed by green, yellow and orange, progressing to red and deep red. The spectrum of light is measured in nanometres. The light range is between 700-1200nm (nanometres). Another aspect of infrared spectrum is thermal imaging. This technology is especially popular in the movies such as Patriot Games and other thrillers, where intelligence agencies or military personnel were able to detect villains by measuring their body heat during night time conditions. Today’s common digital camera sensors are not able to detect thermal images. Under the right circumstances however, digital cameras can do an excellent job of recording infrared images.


What is Infrared Photography?
In infrared photography, film or image sensor is sensitive to infrared light. The sensors used in digital cameras are sensitive to light with wavelengths of up to 950nm, which includes IR light range. A simple test to check is to point a television remote towards the camera lens and press any button on it. If you see a light on LCD display that you cannot see with your naked eyes then your camera is sensitive to infrared light.
Just know that anything which is alive will reflect a greater amount of infrared light than inanimate objects. Leaves, foliage, and grass, along with skin, reflect the greatest amounts of infrared light, and so it will be the whitest objects in your image. Stones, concrete, mountains, water and sky tend to absorb infrared light and so appear as darker objects in your images.

Most of the digital cameras have an infrared blocker that is great for regular photography but not for infrared photography. Removing that filter is a fairly complicated and expensive process, so don’t try to do it yourself. There is the way to block all but the infrared light from your sensor. You can mount a special infrared filter on to your lens. The filter is a dark glass that cuts the amount of light by 10 stops, so you have to take long exposure shots. These filters can be mounted onto the lens and their cost depends on the size of the thread of the lens. Additionally you will require a DSLR camera and a lens with a decent wide zoom focal length, a tripod and bright sunshine to get the best results. Shooting infrared photographs have two major components – shooting and post processing.


Shooting Technique:
1. Find a suitable scene.
2. Use Tripod: Put your camera on a tripod to avoid shake. IR filter lets in very small amount of light so your exposure will be too long to shoot handheld.
3. Focus prior to attaching the IR filter. You need to do this because camera can’t see the scene once the IR filter puts on to the lens. Once desired focus is achieved, switch to manual focus.
4. Attach your IR filter.
5. Experiment with the exposure. Try using various shutter speeds, start with 10sec at f8 and ISO 200.
6. White Balance: If your camera offers a custom white balance preset, take a picture of a gray or white card with the filter on. Make sure that direct sunlight is hitting the card. Refer to your camera menu for how to set custom white balance. If everything is still coming out red, you will have to adjust the white balance in Adobe Camera RAW or any other raw editing software of your choice. This is probably the trickiest part when working with infrared filters. 
7. Use self timer mode, that will eliminate any chance of camera shake.
8. Take the shot.


Another option for taking infrared photograph is to convert your camera sensor permanently to dedicated infrared sensor.
Converting your camera to dedicated infrared
Permanently converting your camera to infrared is a great solution if you have an extra old camera body. The main advantage of having your camera converted vs. using infrared filter, is that you no longer grounded to using long exposure and can take infrared photographs of people and other moving subjects. The procedure consists of removing the hot mirror filter directly from the sensor and replacing it with clear or custom infrared filter.


Post Processing
 
Neston Simoes ©

To process any infrared image and remove the red casts, first open the image in Camera Raw and fix the white balance by clicking on the foliage with the white balance tool. Once done, open the image in Photoshop, and Click on the new Adjustment Layer in the Layer panel and choose Channel Mixer.
 
After choosing the Channel Mixer select the Red output channel and move the Red slider to 0 and the Blue slider to 100.
 
Now select the Blue output channel and move the Blue slider to 0 and Red slider to 100. This will give you the good starting point.
 
Now go to the Hue and Saturation Layer Adjustment and here you can edit the Red and Blue channels individually, as per your choice till you get the desired result. You can also convert them into Black and White by using Black and White Layer Adjustment.

I hope you have learned now how to shoot and edit Infrared photos. The sunny days are perfect to shoot infrared photos when the sky is nice and blue. If you try it out, do send us your images.


A Beginner’s guide to HDR Photography

If you want to take advantage of the latest technology and add some wow factor to your vacation photographs then HDR photography is a good place to start. In this article we are focusing on giving you tips on How to take great HDR photographs and process them with the help of HDR processing software.

Diego Delso ©

What is HDR?
HDR stands for high dynamic range. As per the name, this technique aims to add more “dynamic range” to your photographs. The dynamic range is the ratio of light to dark in the photographs. So in this technique rather than clicking only one photograph, you need to click at least three photographs at different exposures of a same frame. You can then use the image editing software to stack these images together to get the final HDR image.


Where to use HDR?
Many times while shooting some scenes you face the problems as there is too much contrast in the scene and to capture those scenes correctly exposed is a very difficult task. So in such situation HDR will be very helpful. 

Here are some of the situations where you can use HDR: Landscapes: 
Huge wide landscape photos usually have a lot of contrast between the sky and land, which is very difficult for your camera to capture with just one photo. But with HDR you can capture sky details without making land look too dark and vice versa.

Portraits in Harsh light:
Lighting is one of the important aspects to click a good photograph. But too much light on someone’s face (Harsh light) can cause dark shadows and bright glare. Using the HDR technique one can even the all out and make your subject looks better.


Low-light or Backlit scenes:
If you are getting very dark photos-which often happens when you are shooting backlit scenes. In such situation HDR technique can brighten up the foreground without overexposing the well lit portion of your photograph.

Where not to use HDR?
As you can learn now when to use HDR technique, but there are some drawbacks too in using this technique. Sometime HDR actually makes your photos look worse. 
Here are some situations where you should avoid using HDR technique:
With the moving subject:
If any of your subjects are moving then using the HDR technique increases the chances of getting blurry photographs. Because HDR takes multiple photos with different exposures. So if your subject is moving in one of the frame then the final image won’t look good.

High contrast situations:
Some photographs looks good if there is high contrast in it. Situations like if you want to highlight a dark shadow or a silhouette in your photograph, then using the HDR technique will make the photograph look less interesting.
Shooting HDR photos have two major components. One is shooting and another is post processing.
Shooting Techniques:
Follow these steps to capture a perfect HDR photograph.
• Discover the Auto exposure mode in your camera. Auto exposure mode is the main components while shooting HDR. If your camera doesn’t have this feature then you have to set exposure manually for every photograph you take. For HDR you have to take photographs on at least EV -2, 0, +2. You can take more than three photograph as per your wish but at least three photos are must.
• Set your camera on AV mode and determine the aperture. AV mode will be easier and most convenient setting to start with. This setting will let you select the aperture you want for the exposure and let camera decides to take the shutter speed. While shooting HDR you have to consider what needs to stay the same during the brackets. So after selecting the AV mode you have to decide what aperture you want to shoot in. Again aperture values depends on what scene are you shooting. For landscapes you want to get focus the entire scene with no blur in the background, so when selecting aperture remember that higher the aperture greater the depth of field.
• After selecting the exposure there is one more major component is to set your white balance. White balance is very important to your photos colour balance. Auto white balance will work most of the time. But you need to know the different white balance settings too. If your camera couldn’t capture the colours in the scene like you see them. It’s time to change your white balance settings.
• Select your ISO. ISO is simply your cameras sensitivity towards light. The higher the ISO, the more sensitive it becomes. But the downside of the ISO is the more the ISO, the lower the quality of the photograph. High ISO produces lots of noise. So you need to set your ISO as low as possible. 100 ISO will be ideal for HDR photographs.
• With the higher aperture and low ISO settings shutter speed going to become slower. And shooting handheld in such situation can cause some shake in your photographs. So to get the sharp shot in such situation, using the tripod is must. The type of tripod you need is simply depends on you and your shooting style. If you don’t do so much travelling and drive to the location directly and setup then you may invest in a strong, heavy tripod legs. If you love to travel, hike then you will need something light weight, compact tripod.
• Another way to get rid from the camera shake is to use a self timer. This gets rid of the possible shake from holding down the shutter with your finger.
• Now that you have learned all the techniques and ready to shoot, one major thing can make a big difference is to get use of the manual focus. Auto focus is an amazing technology but it isn’t so great while shooting landscapes. If you really want to get everything in focus then you have to switch to manual focus. AF mostly pick certain spots of the frame usually centre and make sure it is as sharp as possible. With manual focus you can set your focus point to infinity to get the entire frame in focus.
• Take the shot.

Post processing
Now that you have taken series of images in different exposure, you need to stack them together and edit it in the HDR image processing software. Given below are the few techniques with the use of Photomatix pro software that will help you get closer to your desired result.


• Open the Photomatix pro software. Click on the load bracketed photos and then click on the browse and select the series of photos you took for the HDR and click Ok. If you don’t have bracketed images, you can still process like HDR using Load single image option. But this will not give you that much impact which you will get through bracketed images.
• If you have any moving elements such as cars or people in your frame. Photomatix allows you to isolate and correct the ghosting. But we can’t give you assurance that it can isolate the ghosting 100%. So to reduce the ghostings check the show option to remove ghosting. If you want to reduce noise or chromatic aberration then check these two options too. You can change your white balance settings too if you shot photos in RAW format. Then after doing all click align and show Deghosting.
• There are two option for removing the ghosting. One is selective deghosting and other is automatic deghosting. Auto deghosting works well most of the time. After deghosting is done press Ok.
• There are inbuilt presets in this software but ideally we would not suggest you to use them. Choose the default presets and process the HDR the way you want to. After you are happy with the result click Apply button and save the final image.
Conclusion
While these are not an in-depth list of HDR tips, it is a good start to get you on the right track to capture your first high dynamic range photos.