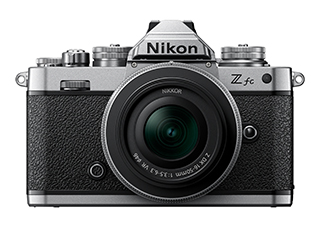
Author Archives: Administrator

Fujifilm India Inaugurates Experience Centre at Museo Camera Centre Gurugram

Fujifilm announced the inauguration of its Experience Centre at Museo Camera Centre for the Photographic Arts, Gurugram. The Fujifilm Experience Centre, in collaboration with Museo Camera, will be the first-of-its-kind where the company will be conducting monthly workshops with their X Ambassadors.


Inaugurating on World Photography Day, Mr. Koji Wada, Managing Director, Mr. Masaki Zenko, Senior Manager of Photo Imaging Division and Mr. Arun Babu, General Manager Electronic Imaging and Optical Devices Division at Fujifilm India were present at the centre. To encourage consumers to learn new skills in photography, Fujifilm India will run a series of workshops every month with their X-Ambassadors.


On World Photography Day, the company is organizing a special six-hour long workshop on the “Art of Travelling” with X-Ambassadors, hosted by esteemed photographers like Dinesh Khanna, T Narayan and Sundeep Bali. These influential and renowned photographers will discuss Culture & Heritage, Documentary & Wildlife and Commercial & Travel centered around the theme of Travel and Photography. The workshop is open to all consumers at a nominal fee and will begin at 11:00 AM on 19 th August 2021 at the Fujifilm Experience Centre in Museo, Gurugram.


Commenting on the inauguration, Mr. Arun Babu, General Manager Electronic Imaging and Optical Devices Division, Fujifilm India Pvt Ltd, said, “We are excited to launch our first ever Experience Centre at Museo Camera Centre for the Photographic Arts, Gurugram. The state-of-art center will be a hub for conducting educational workshops for photography enthusiasts and showcase our extensive line of products. Fujifilm has been a pioneer in camera & its equipment's and with our X Ambassadors on board, we are pleased to share our combined expertise with young professionals and photography enthusiasts. Museo Camera Center is a symbol of bringing the best of the photography world together for everyone and we are happy to be partnering with them."


Alongwith the workshops, Fujifilm will display their extensive product line-up through a demo and product experience zone. Customers will get to experience the complete range of Fujifilm X and GFX mirrorless cameras here. At the Museo, consumers will also get a chance to seek inspiration from the photographs clicked by renowned photographs and displayed at the Centre’s Gallery.

Shaba – A film by Ami Vitale

In the mountains of northern Kenya, a Samburu community is doing something that has never been done before. They have built an elephant sanctuary for orphaned elephants, where they rescue and raise them with the ultimate goal  to reintroduce them back into the wild. The sanctuary isn’t just about saving elephants; it’s about breaking down stereotypes and redefining wildlife management. When people realize that they can benefit from healthy elephant populations, they’re proud to take care of wildlife. 

Reteti is also empowering young Samburu women to be the first-ever women elephant keepers in all of Africa. At first, the community didn’t think there was a place for women in the workplace. Now, the success of these women elephant keepers is unlocking new possibilities and setting a powerful example for young girls hoping to pursue their dreams. It’s also changing how the community relates to elephants. Schoolchildren who have never seen an elephant before or who were afraid of elephants visit Reteti and experience these elephants up close. They then realize they can grow up to be a veterinarian or an elephant keeper.

In the past, the local people weren’t much interested in trying to save elephants. A rescued calf had to be transported to Kenya’s only orphanage, some 240 miles away, near Nairobi. If successfully rehabilitated, the youngster would have to be released into Tsavo National Park, with no hope of reunification with its original herd way to the north. But now, elephant orphans can be returned to their home ground, where they’ll have a good chance of reconnecting with their relatives.   

What’s happening here, without fanfare, is nothing less than the beginnings of a transformation in the way the Samburu people relate to wild animals they have long feared. This oasis where orphans grow up, learning to be wild so that one day they can rejoin their herds, is as much about the people as it is about elephants. 

Since September 2016, they have rescued over 35 elephants and returned ten back to the wild. This is the result of a widely recognized and expanding grassroots movement of community-driven conservation across northern Kenya; a movement that is growing new economies, transforming lives and conserving natural resources.  

Shaba is an 11-minute short film about the sanctuary that will be available on-demand and all ticket sales go directly to support the elephants and their incredible keepers. It will be available until the 31sth of August at shabafilm.org

The film is about an orphaned elephant named Shaba who arrived traumatized after poachers killed her mother in front of her. It took weeks for the team at Reteti to finally forge a connection with her and Shaba soon became the matriarch of the entire orphaned herd. She became instrumental at the sanctuary, caring for each new orphan that arrived and teaching the keepers how to be better caretakers. This is a story about learning to trust those that we fear. Shaba teaches us about love and our connections to all of life around us.

Sony launches ZV-E10 vlogging camera with 24.2-megapixel sensor

Sony has recently launched the Sony ZV-E10 mirrorless camera in India. It is the second camera of the ZV-series after the Sony ZV-1, which was launched in 2020. This series camera is targeted towards video content creators, and by launching the Sony ZV-E10, the company has pumped up the concept of vlogging to next level. This is because the Sony AV-E10 displays various vlog-specific features. While some of the features have been acquired from Sony ZV-1, such as the Bokeh Switch button and Product Showcase setting, there are some new features as well enclosed in the Sony ZV-E10.


Unlike the ZV-1, this vlogging camera comes with interchangeable lens options. Now consumers can attach the company’s E-mount prime lens, telephoto lens, zoom lens, macro lens, ultra-wide lens, or fish-eye lens to the camera.


Sony ZV-E10 features a 3-inch side flip-out touchscreen LCD panel. It is armored with a 24.2-megapixel APS-C Exmor CMOS sensor. It can shoot 4K videos at 30fps, and Full HD videos up to 120fps. It comes with an 11fps continuous shooting supported by the camera. The real-time eye tracking feature works for both – animals and humans – while shooting images.


Sony ZV-E10 has a dedicated button to change between Slow and Quick mode, Photo and Video mode. This allows users to easily shoot slow motion videos without going into settings manually. A standard and active mode image stabilization is present in the camera for taking firm video footages.


One of the highlights of the latest vlogging camera is that users can livestream without any hassle. Users can livestream directly through the camera using the USB-C cable attached to their desktop, or a laptop. The camera also has headphone and microphone ports.


The camera comes in two colour variants – black and white. The white colour option is new and looks beautiful. The camera body is priced at Rs. 59,490 for body only and Rs. 69,990 with Sony E 16-50mm f/3.5-5.6 PZ OSS lens.


Photoshop tips and tricks

Photoshop is an marvelous instrument for graphic design, but there is certainly a lot to learn for photographers, and there’s always more to rule for those who are already experienced. If you’re currently working as a photographer and editor and looking to modify your skills, you probably find that time is a major restriction to improve your knowledge. If so, you will need to develop a plan to enhance your skills step-by-step in the time that you have. If you are an aspiring editor, you may have no idea where to start in order to achieve the level of success of some of the Photoshop masters that we see online or on YouTube. In this, article we’ll look at the steps you can take to increasingly build your skills using tools that are already available.


  1. Follow Tutorials

    There are number of websites or blogs or youtube videos that focus on supplying superior quality tutorials for photographers. There are a increasing amount of other websites and blogs that regularly publish Photoshop tutorials. All of these places are precious resources for enhancing your skills, whether you want to develop particular skills or just looking to modify in general. In order to take benefit of the tutorial sites that are accessible, subscribe to a a couple of sites that you like the most so you don not miss out on new ones (you can also bookmark other tutorial sites in case you want to find them afterwards). With the number of content available in market, you will never be able to work through each tutorial, and you are unlikely to have an involvement in all of them anyway. Try to select one or two per week to try on your own. For most of us, learning is a easy step when we are actually doing things ourselves, so working while reading the tutorials is necessary rather than browsing through them.


  1. Experiment

    The perfect way to learn something new is to experience it for yourself. While tutorials are helpful, you should also take out some time to just experiment on your own to see what magic you can create. You can try to apply things you have learned through tutorials, or just experiment with things you are not well-known with. Photoshop has so many various functions, features and settings that you will really need to become well-known in order to understand their potential. Experimenting will open up your creativity and help you to get more handy with Photoshop. To put the lessons you learn from others into practice by your own, you will need to do some experimentation and adaptation. There may be some tutorials that teach you precisely what you want to do, but more likely they will teach you a skill or technique that can be used, but you’ll need to set it to fit with your project or image.When experimenting, find something that suits best for you in terms of learning new tricks.

  2. Start with basics

    There’s so much to learn with Photoshop and so many outlook that it is important to get a hold of the basics before attempting to move on the advanced. Like anything else, the basics of your Photoshop knowledge is will help you in future. If you are beginner, rather than trying to follow with advanced tutorials, take some time to get your perfect hands on the basics before anything else. Start with tutorials on all of the basics of Photoshop, like the interface, the tools, shortcuts and more. Having a proper knowledge of these items will make it much easier when you want to work on advance part later. After that start to cover topics as typography, web components and photo manipulation and then you can move to advanced tutorials.

  3. Participate in groups and get reviews

    After you have learned some tutorials and you have done some experiment by your own, it is helpful to get feedback and review from other designers as well to improve of the parts which are still not perfect. There are groups of graphic designers on social media all over the place that can be excellent for feedback and review. There are hundreds of groups for designers that are not connected with a particular blog or websitewhere you can get honest reviews for your experiment. Groups are great spot to share your work with other designers or photographers who are also enhancing their own ability. You can get active by giving honest feedback to other people on their work, and you will get more result on your own work indirectly. If you are interested in a place where you can share your experiment to continue the learning activity, try some Flickr groups.

  4. Find an pro to follow

    Regardless of what field you are into, following and learning from a professional can be highly helpful, and Photoshop is no different. If you want to become a good editor, find someone that you look up to and pay close attention to their work. Fortunately, being in this field that is related to technology, it is easy to find experts online and see their work, read their blogs, and interviews.These interviews provides information about their lives and their careers that can help you in your own work and career. If you already admire someone, subscribe to their blog, search for them on social media, keep an eye on their daily uploads. If you do not have any expert you admire, concentrate on work that you like in groups, see what stands out to you, or find a particular tutorial writer that has a mode which you acknowledge. In some cases you may be able to get in touch with the particular person through their site or through profiles on social media and having a conversation with them will help you more to learn.

Tips to capture best waterfall images

Currently we’ve come that part of the season where Sun is being mean but the weather is changing on a day to day basis and its difficult to predict. The cloud play has begun after a crazy summer in India. India has already started receiving monsoons in various parts counting on the climate conditions including some places which has seen heavy rainfall within the start. The monsoons are highly awaited in India. Be it for farmers or nature lovers or people, it brings relief to the hot weather situations. Rains are beautiful no doubt, the water cleans all the dust and dirt and things around providing a new life to the surrounding. The environment looks greener and everything including the earth smells fresh. Now the rains also get during a lot of water and every water bodies get filled to the max. Similarly, canals, lakes, rivers and waterfalls look even more amazing when it’s filled with water. This month we’ll assist you with some important tips on capturing waterfall photos in India.


Shooting waterfalls is a must to-do, especially with those folks who shoot nature and landscape. Shooting a waterfall is fun and very rewarding especially if you recognize the way to get the best waterfall images. The whole idea of shooting a waterfall is to point out its is flow and motion, sometimes bigger waterfalls are visualised in wide angles to offer a thought about its vastness and size. A waterfall also will be suffering from its flow of water and particularly during monsoons where all water bodies are full and flowing. It becomes an excellent opportunity for photographers to capture images of the waterfalls. Waterfall images are often made very interesting with a mixture using lens, composition and tools sort of a ND filter or a polariser. In this article we’ll discuss some tips to form your waterfall images even better and guide you to a number of the gorgeous waterfalls in India where you can go and shoot amazing images.


To begin with capturing waterfall images, you’ll need a camera that has full manual control over the settings, be it a DSLR or a mirrorless camera. Although it’s not really necessary to possess high end gear to capture good images and your crop sensor camera is quite enough.


Using an ND filter.

ND or Neutral density filters control the mount of sunshine hitting your sensor. This becomes very helpful in situations where you’ve got to regulate the quantity of sunshine. You can do an equivalent changes with the settings of the camera also but an ND filter offers you more freedom when you would like a bigger aperture within the middle of the day. There are a couple of disadvantages with ND filters, especially while shooting landscape and therefore the time of the day has harsh and hard sunlight. In such cases there’ll be areas with high intensity light forming hotspots then the shadow areas. In such a case, using an ND filter will get lesser details in the shadow region. To solve this, you ought to consider shooting at dawn or dusk depending on the intensity and direction of the sun.


Pay attention to details just like the environment, the direction of sunshine and the the elements that you simply want in your frame. It’s important to compose your shot before you press the shutter. Employing a wide angle lens will allow you to bring more area into your frame.


Choose your exposure correctly.

If you’re fixing fully manual, it’s suggested that you to take it easy on the settings. One thing you will surely require while shooting a waterfall its the sense of motion and flow. This needs opening the shutter for a extended time for that the exposure can capture the flow of the water with the environment perfectly steady. Sometimes there is going to be a considerate amount of wind and this may cause the trees and a couple of elements in your frame to move and cause blur. This can be overcome by shooting multiple exposure and a couple of where the exposure is balanced for a faster shutter speed so that the elements can be captured steady. Later the pictures are often stacked in post-processing and a wonderfully blended image are often achieved.


Use a polariser to eliminate the unwanted reflections in the image. When shooting waterfalls, you’ll encounter variety of places where there will be tons of reflections. Reflections do look good in some situations but most of it might be unnecessary. So you’ll need to adjust the filter to get the utmost effect of removal of reflection.


Take a look at the histogram.

The histogram shows the quantity of highlights and shadows within the image and always keep the values from blowing up. An excessive amount of highlights or too dark shadows aren’t desirable as there’s tons of details which will be lost within the shadows and highlights. You have to shoot in RAW file format to permit you to fix anything that has gone wrong. But always make sure to have a glance at the pictures and fix anything directly inside the camera instead of depending upon post processing.


Use a tripod

Use a tripod to keep the camera steady, select the smallest ISO and set the aperture narrow. See the desired shutter speed if achieved or use an ND filter to get even slower speeds. The thought is to get the water in motion which can look milky after completing the exposure.


Most places and countries have some or the other waterfalls flowing. These waterfalls tend to be bigger and more beautiful during the monsoons and make incredible subjects for landscape photography. In India, there are quite a couple of waterfalls and if you would like to travel and capture some waterfalls, Google about the amazing places in India where you’ll get the simplest waterfall images.

Fujifilm India appoints Koji Wada as the new MD

Koji Wada stepped into the role of Managing Director for Fujifilm India, the imaging technology company, as of June 29, 2021. He has taken over from his predecessor, Haruto Iwata, who will now lead the operations in the Asia-Pacific region of Singapore as Managing Director. In his new role, Wada will spearhead Fujifilm’s operations and business strategy in India focusing on organizational growth and profitability with an integrated approach towards sales, marketing, and business policies.


Wada has been contributing to the businesses across corporate offices in Japan, Myanmar, Thailand and India. He brings a vast experience of over 20 years. Before taking over his role as managing director, he was responsible for leading the medical business of the company in India as a general manager.


‘I had joined Fujifilm in 2001 and it has truly been an incredible journey for me,’ Wada said. ‘During my tenure at the company, I have had the opportunity to work with an excellent team of skilled and motivated professionals. As I transition into the new role, I am looking forward to collaborating with the teams across various divisions to take the company to newer heights. With India as a market thriving with opportunities, we will continue with our endeavor of “Never Stop” adding value to the lives of consumers and stakeholders.’


This is Wada’s second stint in India. He was marketing manager of PI, EI, RM for Fujifilm India in 2007. Post that Wada was appointed as the secretary to Global CEO Shigetaka Komori.


Later, Wada was made the general manager for Fujifilm Thailand in 2014 and then managing director for Fujifilm Myanmar in 2017. In 2019, he was appointed as the senior manager of ME and director of FFIN.

Reasons Behind Your Unsharp Photos

Having at least some part to be sharp in every image is a goal for most photographers. But it doesn’t always turn out that way, specially for photographers who are in the process of learning photography for the first time. After all, several things can put a stop to sharp photos. The list below is not a complete list as you can find many other difficulties just waiting to blur your images. We chose only the problems that you always have to look out for.


Handheld shots for long exposures

Your arms aren’t as stable as a tripod. They shake a little, and so for handheld shots, you cannot set your shutter speed to a very low value. Telephoto lenses can significantly magnify distant subjects, but every millimeter of hand motion can mean as much as a meter-wide jump for the objects in the frame. The general rule of thumb is that you can use a shutter speed of up to [1/focal length] seconds. So with a wide, 24mm lens, you can use up to 1/30 seconds approximately, while a telephoto lens with a 400mm focal length will need a much shorter time: 1/400 second. If there’s not sufficient light for the shot, then you need to increase the ISO, decrease aperture value or use the stabiliser if your camera or lens which comes with stabilisation. When none of these options works, then you can shoot using a tripod or lay your camera on a flat surface. If there’s nothing usable around, then you can support with your hands against your body. That gives you more steadiness, and so you can use somewhat longer times. By leaning against a tree, you can improve things even more.


Times Too Long for the Action

You can keep the camera as steady as you want, but if you’re photographing humans or other living beings, their movement in images will be blurry. So, when shooting social events, you keep to a shutter speed of 1/125 second or faster than that. Or at worst at a shutter speed of 1/60 seconds, but in that case, be prepared to risk having blurring in your images. If you want to capture sports, you’ll find that even shorter shutter speeds are required. They can need shutter speeds as fast as 1/400 seconds, depending upon the sport and the photo’s style. Here neither a stabiliser nor a tripod will assist you, so if you’re shooting within a hall with a restricted amount of light, unfortunately, the only answer is a good camera and lens which works well in low light.


Not Using a Tripod

But there are also images that instantly demand a tripod. Special shots like long exposure photos of the milky way or star trail shots or panning of moving cars etc. A tripod can assist you to maintain shutter speeds that are much much longer. But to work with a tripod isn’t as easy as it might seem. We recommend you to research which kind of tripod you may require and about tripod mounts, weights and so on before investing on one.


Leaving the Stabiliser on

While it’s best to leave the stabiliser switched on in low light conditions, there are also cases where it’s best to keep it off. These mainly refer to when capturing photos using a tripod, where a stabiliser will start vibrating your whole body due to the motor. Certain stabilisers only allow you to turn it “on” and “off”, but some also provide a third choice, “on for one axis only”. This fixes the problem of panning etc when the stabiliser is on.


Leaving the Stabiliser off

Photographers many times forget to turn the stabiliser back on after shooting on a tripod. And also, sometimes they might accidentally push its physical switch while manipulating the lens, or while taking the camera out of the bag. That’s why it is best to stay alert and, if the image in the frame is unusually shaky, double-check if the stabiliser is turned on.


Low Depth of Field

Difficulty with low Depth of Field is mainly displayed in two situations. The first is when you are using a DSLR with a prime lens and an f-stop of say f/1.8 which is a great low light choice mostly. It gives you a superb optical detachment of subjects from their background by using bokehs. The trouble comes when photographing more than one subject in one frame who are standing in different focal planes. You need to keep in your mind that for images like these, you have to keep aside the block lenses or increase your aperture value to f/4 or above to keep all the subjects in focus. Otherwise, all it takes is for one subject in the group to take a half-step back or front, and they get out of focus. Another problem shows itself when you are capturing landscapes, and you want to capture both small objects and a far horizon. Sometimes even the highest f-stop isn’t enough, and the only answer is to merge a picture from two images, one focussed closer and the other farther.


Bad Focus

Sometimes the automatic focus in the camera can be faulty too. It is sometimes disturbed by small nearby objects such as bushes behind people or moving objects in the background. Bushes provide lots of high-contrast points that your camera is happy to focus on. So for such a situation, all you need to do is turn off autofocus and focus your subject using the focus ring manually on the lens. Macro shots require high levels of focussing and it is often advisable to use manual focus for the same.


A Defective or Low-quality Lens

Once we get down to minutely examining a photograph on a pixel level, there is a clear difference between an expensive, high-quality lens and a lower-quality one that is supplied with beginner cameras. If you are bothered by blurry lenses, there is only one solution: research about the lenses and spend on a decent one. After the research, you may see there’s also a difference between a good lens and a great lens. If you consistently get bad results when the reviews say you shouldn’t, it’s time to take your lens into the shop for cleaning or other defects.


Bad or Dirty Filters

A good lens is a good beginning, but you can always make it terrible with a filter. There’s no risk with good filters, but look out for low-budget ones as they can pose problems for the lens during focussing which can cause blur and even add overexposed spots on the photographs.


No Computer Sharpening

Knowledgeable photographers always sharpen their images after reducing them down to presentation size. If you just reduce the picture size without sharpening them afterward, your work will probably look unprofessional at best.

You might already be well-known with the above mentioned points, but some might be new for you. No matter what, it is good to be cautious, and, if supreme sharpness is your goal, shoot slow and steady. As soon as something seems fishy, go ahead and look into the problem. Nonetheless, for other problems, you need to understand where they are coming from and try to check if any of the above mentioned things can help you out. Make sure you do not let any dust or other particles fall on the sensor or the lens when changing lenses outdoor. Your reward will be images that are sharp and stand out from the rest.


Canon Announces New Firmware Updates For Cinema EOS Cameras, EF- EOS R 0.71x Adapter and Compact-Servo Lenses

Canon recently announced the launch of new firmware updates for three Cinema EOS Cameras, EF – EOS R 0.71x adapter and two Cinema lenses. The EOS C500 Mark II, EOS C300 Mark III, EOS C70 cameras, EF – EOS R 0.71x adapter for the EOS C70 and Canon Compact Servo lenses will receive highly requested updates with the new firmware arriving in the coming July.


EOS C500 Mark II and EOS C300 Mark III feature updates

Both the EOS C500 Mark II and EOS C300 Mark III will receive updates that will optimize on-set workflow and overall usability. To further enhance monitoring and external recording flexibility, the 12G-SDI output will support FullHD and 2K resolutions with the new update. Simultaneous MON.Out and HDMI outputs will also be supported, allowing for increased video outputs on set. Canon’s new “XC Protocol” that supports remote camera control usage with Canon’s RC-IP100 controller will also be added. 1.8x Anamorphic de-squeeze option will also be added to existing ratios, increasing support for Anamorphic lenses.


EOS C500 Mark II New Anamorphic Recording Modes

In addition, the C500 Mark II will gain two additional Anamorphic recording resolutions: 4192 x 3140 (4:3) and 3768 x 3140 (6:5). These resolutions will be available during Full Frame Sensor Mode in Cinema RAW light recording, broadening its abilities for 4K anamorphic recordings.


EOS C70 firmware update

The recently launched EOS C70 will also receive feature improvements in response to user feedback. The HDMI Out will be updated to support View Assistance for external monitoring. Seven EF lenses will also receive full Dual Pixel CMOS AF and metadata support when used with the EF – EOS R 0.71x adapter. This update will also allow users to turn off the AF Frame when the adapter is used and the camera is not in AF mode. Lastly, a 2x option is added to Magnification, allowing for flexibility during frame magnification.


EF- EOS R 0.71x Adapter updated with support for Seven Additional EF lenses

Accompanying the EOS C70’s update is the new firmware for the EF – EOS R 0.71x adapter. This new update will add support for seven new EF lenses. New models supported are:


EF16-35mm F4L IS USM

EF16-35mm F2.8L II USM

EF24-105mm F4L USM

EF70-200mm F2.8L IS II USM

EF70-200mm F2.8L IS III USM

EF70-200mm F4L IS USM

EF70-200mm F4L IS II USM


The firmware updates allow the camera to recognize and support the new seven lenses fully. This includes accurate conversion of F-number values, metadata, Auto Exposure and Auto Iris functions as well as Dual Pixel CMOS AF operation across large areas of the frame. Lastly, the firmware also allows for peripheral illumination correction function to be utilized.


CN-E18-80mm T4.4L IS KAS S and CN-E70-200mm T4.4L IS KAS S support for EOS R5

Rounding up the firmware updates will be a new firmware to improve usability on the CN-E18-80mm T4.4L IS KAS S and CN-E70-200mm T4.4L IS KAS S compact servo lenses. The new firmware update will allow both lenses to communicate with Canon’s EOS R5 full-frame mirrorless camera, a combination that has been widely requested by many users. This will result in functions such as metadata, optical correction, autofocus, auto exposure and image stabilisation functions being supported, allowing the capabilities of the lens to be used with the EOS R5. All firmware updates except for CN-E18-80mm T4.4L IS KAS S and CN-E70-200 T4.4L IS KAS S are expected to be available in July.

Tamron 17-70mm f/2.8 Di III-A VC RXD Lens Review

In this video we review the Tamron 17-70mm F/2.8 Di III-A2 VC RXD (Model B070 Lens, which is the latest lens from Tamron for the Sony APSC crop body. We have reviewed the lens for image quality, video quality, CA, distortion and more with sample images and also talked about the overall look, body and feel of the product. The price of the lens is Rs. 67,500 in India and on the Tamron website. So incase if you are looking for a new lens for the Sony Crop body then you have to check this review.