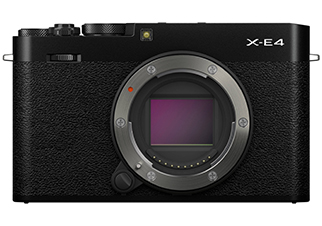
Author Archives: Administrator

Canon Celebrates 50th Anniversary of its First Interchangeable Lens for SLR Cameras to employ an Aspherical Lens Element

Canon recently announced that 2021 marks the 50th anniversary of the release in 1971 of the FD55mm f/1.2AL, the company’s first lens for interchangeable-lens SLR cameras that employs an aspherical lens element. Aspherical lens elements are not only used in the company’s interchangeable-lens SLR cameras, but also broadcast lenses, semiconductor lithography systems, telescope mirrors and a wide variety of optical products.


Aspherical lenses possess a curvature that are ideal for gathering light at a single point. From the f/2.8L IS USM zoom lens series for professional and enthusiast users—the RF15-35mm f/2.8L IS USM (released in September 2019), RF24-70mm f/2.8L IS USM (released in September 2019) and RF70-200mm f/2.8L IS USM (released in November 2019)—to the RF28-70mm f/2L USM (released in December 2018) which realizes a fast f/2 aperture across the entire zoom range, Canon’s aspherical lenses help reduce various types of aberration and achieve high image quality.


The inherent characteristics of spherical lenses result in the lens being unable to focus parallel rays of light in their complete form at a single common point. Due to the lens’ spherical-shaped surface, blurring of captured images—known as spherical aberration—and other optical aberrations tend to occur in the captured image. In order to correct spherical aberration, multiple spherical lenses must be used and placed in a specific configuration. However, thanks to their unique properties, the same results can be achieved using only a single aspherical lens. In 1963, Canon embarked upon a program of sophisticated lens research and development in order to develop this “dream lens” that could focus all incident light on a single point and create a faithful, clear image.


In order to mass-produce aspherical lenses, Canon needed processing technology that was precise to within less than 0.1 micrometers1, as well as high-precision measuring devices that could measure to within 0.01 micrometers. Through repeated cycles of design and processing methods, the company finally succeeded in creating the technology needed to mass-produce aspherical lenses. In March 1971, Canon’s first interchangeable-lens SLR camera employing an aspherical lens was released—the FD55mm f/1.2AL.


Then, in 1973, Canon further enhanced the precision of its lens processing technology with the development of the ALG-Z nanometer2level ultra-high-precision aspherical lens grinder. The next leap forward happened in 1985, when the company successfully implemented the large-diameter glass mold (GMo) aspherical lens element into the New FD35-105mm f/3.5-4.5 (released in December 1985), the world’s first interchangeable lens for SLR cameras to include a GMo aspherical lens.


Ever since, the technologies used to form and measure aspherical lenses have played a vital part in Canon’s efforts to realize high-performance lenses.


Going forward, Canon will continue to polish its optical technologies in order to create products and technologies that help meet our customers’ wide-ranging needs.

Stop! That’s not the way to shoot! – Ethics of Wildlife Photography

I will not harm my subject!”


Every photographer should happily follow this simple rule – even when no one else is watching.


This is not a hard job for anyone, and for those with a true love, nature is always priority for them. Unfortunately, thanks to the huge numbers of photographers who now own professional photography gears, and are perpetually on the look out for nature subjects to capture and instant satisfaction after uploading the images on social media and there are examples of photographers damaging wildlife or habitats in chase of the perfect shot, which has been alarmingly common. Many of it is due to a lack of awareness and knowledge.


Whatever it might be, one thing is sure, if right-minded nature photographers get together, we can stamp out the danger of unethical photography to a large extent and it will also help the beginner generation to learn ethics. Self-regulation is the best regulation, so make sure to follow all the rules before you step into widlife.


Then, now and will


One of the most shocking chapters in the history of wildlife photography in India is the bird nest photography trend that outspread like wildfire in the early 1990s. Battling to other photographers, many photographers skilled a level of harshness and insensitivity that was terrifying. Their practice was a bit simple: they would watch around, or offer money to the locals, for finding the active nests for them. Once the nest of a wanted species was located, the photographer would go and do some gardening – a substitute for removing branches or leaves to get a proper view of the nest. With the obstacles out of the way, nesting activity would be captured from all the angles, sometimes using external flashes placed around the nest. Once the photographer was satisfied with their results, they would leave, exposing nest open to predators. Some photographers even destroyed the nest (or eggs or chicks) so that others could not take capture the image they have.


This battle was in trend for few years, until there was strong stricture from photographers and nature conservationists with a moral sense. The harmful practice finally end when nest images were banned from competitions.


Back then there were very less nature photographers in India, so any harm caused by a few unethical photographers was very less. Since there is no entry exam or test for newcomers, the annual increase in the number of wildlife photographers was tremendous. Cameras and lenses was very expensive due to custom tax duties. It was very hard to see a photographer with a 300mm lens. Film and printing was costly too. And not every photographer had a car to take off in the outskirts on weekends. The kind of budget needed to follow this costly hobby was largely limited to very few people.


But all that was transformed with economic reforms and the technology upgrade. Suddenly, beginners were able to get five-figure salary jobs straight after graduation. At the same time, custom tax dropped down, camera manufacturers started setting up dealerships in India, social media started becoming a trend, and wildlife documentaries on TV and internet lighted an tremendous thirst for travel and photography. Nature photography as a hobby increased like a boom.


While its not a crime with enjoying nature and capture wildlife, how one does it that matters. Enjoyment must always be baked with responsibility. Unfortunately in India, the two rarely go hand in hand. You will mostly see an educated person who’s the wrongdoer rather than some uneducated. And there are millions of educated people with high sound cars, but with utterly no sense of road rule and then there are thousands of educated people with the best cameras and lenses, but very less love towards nature.


Unethical photography? What’s that?


Many photographers likely don’t even think about their impact on nature and wildlife, and may take animals simply as models that exist for capturing pleasure. They don’t even think that their actions can cause stress to an animal. Simply becoming aware of the issues might make any photographer good and helpful. And those who are decent and can think properly on their next outing, and change their behaviour appropriately will be a great help.


For example if we consider one of one of the world’s rarest birds, the critically endangered Great Indian Bustard. This large bird, which is found in grasslands, is extremely shy of human interaction. When it spots a intruder even hundreds of metres away, its reaction is to hold whatever it is doing and fix its eye on the intruder. As long as it feels threatened, the bird will not feed, court or mate. As a result of the disturbing activity caused by some few photographers, the Ministry of Environment and Forests (MoEF) was forced to issue a circular restricting photography of the bustard during its mating season.


Damage to habitats can be big too, when many people and their vehicles are found on a particular location. For example, the Hesaraghatta grasslands on outskirts of Bangalore suffered high damages as a result of insensitive weekend bird photographers. Luckily, thanks to the problem being highlighted and talked about on social media and photographers, there has been a change for the better in some areas.


While it’s impossible to measure or list every type of unethical behaviour of every unethical person; awareness, knowledge and common sense are the best guides for every photographer out there. If you think that something you are doing, or are planning to do, may cause harm to your subject or habitat, back it off. It’s that simple.


The way forward


Like it or not, the craze for wildlife photography seems to be growing like anything in India. So it’s better that we work together to decrease the negative impacts. Well as of now we don’t have any ‘All-India Association of Nature Photographers’ to set rules and regulations and supervise behaviour, how do we go about controlling the practice of nature photography by every nature lover in our country? There isn’t any one way of practising it, but that doesn’t mean we should give up our responsibility to protect the nature.


The best and most important factor in changing behaviour of the coming generation might be to set a good example or inspiration. Good inspiration or role models are important in every field, and wildlife photography is not different. If you are a experienced photographer, try to be a good role model for your audience, and lead by example. If newbies are following you and have questionable practices, they will learn and assume that this is how wildlife photography is to be done, and imitate you. If you are seen having respect for nature and wildlife, not only will your respect go up, but your attitude may also put a good impact on others.


After you are experienced, you will definetely also have a lot of followers on social media platforms. Reach out to the professionals once in a week with messages about ethics in wildlife photography. Also try to share the tips with your fellow followers as well as it will make a strong belief on those who are still not aware about the ethics in field.


If you are conducting wildlife photography workshops, start and end each workshops with a strong appeal for ethical behavior when capturing nature. Make your audience take a honest pledge towards ethics. This will definitely impact those who have less knowledge or are less aware. As for those who simply don’t care about nature and wildlife, they will be automatically change their behavior when more and more photographers become humble towards nature and intolerant of unethics.


To multiply your positive effect among the younger generation, the most important thing is not to be distrustful about your knowledge to bring about optimistic behavioural change in other photographers. Here’s an example of something that all have seen in our surroundings: when a area or road is kept clean due to the efforts of some of its locals, others think before littering the place. Even if they do, there are eyes to criticise or shame them, making sure that they don’t litter again, that’s how you bringing everyone into line. In the same way, you can clean up unethical wildlife photography, if we practice together and learn what’s right.


Examples of unethical practices and how to curtail them

While it’s not possible all the time to specify ‘unethical’ in black and white terms, or point out every example.


Please note that some of these activity, in addition to being unethical, are illegal and violate various wildlife and environmental laws. If reported, they could draw in strong penalties and legal action.


Issue 1: Crowding

Too many visitors or safari jeeps gathering around an wild animal in National Park or Wildlife sanctuary, or purposely going too close to provoke a growl or a attack.


Impact:

Causes high stress, and breaks the wild animal’s natural behaviour, such as courtship, hunting and feeeding. In the case of big animals like big cats or elephants, regularly being close to them can be dangerous.


Remedy:

When you sight a wild animal, always keep a safe distance between the safari and wild animal. When you see other safari coming, take a few photographs and leave that spot. If you see any officials, drivers or photographers breaking the rules, carefully take a picture or video of this and report it to someone in authority.


Issue 2: Nest or den photography

Capturing images of mammals at their dens orbirds at their nests.


Impact:

This causes disturbance and stress in animals and they can abandon the nest or den. In the case of big cats, it forces the parents to move their juveniles to another den, which can be dangerous for them. This can also attract other unethical photographers and poachers too.


Remedy:

Avoid capturing images of nest or den. Stay away from newborns or juveniles. This also includes manipulating nest or nest area. Publishers and competitions should be very strict about accepting nesting and den photographs.


Issue 3: Playback of birdcalls to attract birds


Impact:

Wildlife survey have shown that this can cause stress to birds. The available study material advice that replying to call-playback may effect in bird energy, disturbs their territory and can lead to pair break-ups. Playing bird sounds during their mating season can confuse adults from more crucial tasks like mating, guarding the nest, and defending their territories.


Remedy:

Refrain from use of bird calls, particularly for rare and endangered birds.


Issue 4: Handling amphibians and reptiles for photography


Impact:

To start this, picking up and handling wild animals is illegal. It also causes them terrible stress. If a snake is feeding on something, the first response to handling will be to vomiting its food.

Amphibians can be infected with bacteria from your hands, which can be fatal to the individual and sometimes to the whole species in the area. Taking them out of their habitat will cause their body or skin to dry up, and can be tough to survive. Some photographers refrigerate fast-moving reptiles and amphibians in order to slow their activity for capturing images. This is extremely damaging to their body and may even cause death, not in front but after you have moved on from the spot.


Remedy:

Capture images of reptiles and amphibians in their natural habitats without handling or moving them. Work with an ethical herpetologist or guide to ensure that no harm comes to wildlife.


Issue 5: Speeding in wildlife habitats


Impact:

Driving fast to sight a animal or to exit the national park before the gate shuts, not only frightens animals but can lead in animals getting run over. Although speeding is strictly not allowed in wildlife areas, it is quite common to see.


Remedy:

Follow the speed limits. If there is no speed limit mentioned, try to keep low speeds (20 kmph) to make sure that there is decent time to stop the vehicle if an animal suddenly crosses your path. File complaints against drivers who speeds the vehicle.


Responsibility from publishers & editors

We think that it is a responsibility of publishers and editors of wildlife and photography magazines or books, as well as social media pages and Facebook groups, to ensure that their audience meet ethical standards before publishing their images. Photos that are problematic should not be accepted.


Conclusion

We believe that following these rules and sharing them with every wildlife and nature photographers will improve the well being of wildlife and natural habitats. In this field, a photographer must have a good mind and, when in doubt, nature and wildlife should always get the profit of doubt.


Let’s enjoy nature responsibly!

Smartphone photography tips for better photos

Smartphone cameras have improved a lot from beginner to professional in past 5 years, with companies pumping up the resolution, adding more lenses, and providing photo storage options that lets you snap without fear of storage getting full. Look for accounts on Instagram who is doing phone photography and you’ll soon observe that the images shot using a mobile these days are giving tough competition to cameras. If you have a smartphone with great camera, you should definitely step up your photography game. So here are some tips and tricks, along with some phone photography gear recommendations, that will take your snapshot game from amateur to professional.


First, start with a clean slate

Before you capture a single image, you have to make sure your phone is in order. Often, that means do a pre-shot cleaning. That’s the first rule for any phone photographer. While wiping your lens on your t-shirt might do the job, using harsh materials, like a shirt, or a handkerchief dipped in water, may end up harm your phone lens after a certain time. If you like to keep scratch free, use a softer cloth like a microfiber cloth which is used for cleaning spectacles or sunglasses to get rid of any smudges off your phone camera lens.


A little framing goes a long way

Framing shots needs a creative head, but that doesn’t mean you have to do everything up all by yourself. Fortunately, you can take help from your camera to assist you when it comes to framing and composing your images.

In iOS, go to Settings and click on Camera. From there, turn the “Grid” to position a rule-of-thirds overlay in the phone camera. That grid will assist you to compose your photo more perfectly, and it will also help you to keep the image parallel with any vertical or horizontal lines in your shot. On Android devices, go to Settings > Apps > Camera, and turn on “Grid Lines”.

Framing is one part of composing the picture itself and so always make sure you’re not including any distracted subjects while capturing. It is suggested to make sure that everything in the frame is there because you want to include that part in frame.


Ditch the digital zoom

Every photographer loves to get a closer look at that subject. But zooming in before you capture the image is not the perfect way to get close. Digital zoom photos are just cropped and re-sized photos, unlike the optical zoom which you can find on good cameras. Digital zoom will not only give a noisy picture, it will also cut down the resolution of the overall picture and show up any vibrations from your hands while capturing, leaving you with an bad image of your beautiful subject. It is highly suggested to avoid digital zoom as often as possible but go for the telephoto lens on your smartphone, if it has one or you can buy a external good quality telephoto lens from Amazon.


Look for light before using flash

The flash of an LED light from a smartphone is not really great to provide good images to flatter anyone, no matter how beautiful you look or how well you are posing. And that blazing light comes from a single source will make your picture look harsh, odd-coloured compared to the image shot on natural light.

Rather of depending on an smartphone flashlight to decently light up your subject, search for other light source you can use, be it the falling sun, some indoor lights, or even some candle light if you want to get creative images. If you are really at a loss for external light, you can always go for a external LED or another smartphone’s flashlight mode to give a better light outcome on the subject.


Watch out for cloud storage

Cloud storage services, like Google Photos or iCloud, can be a perfect way to capture thousand of photos without stressing over the space left on your device. But some of these storage don’t automatically uploads the highest resolution version of your pictures. If you capture lots of images then you will have to pay a monthly fee to back up all your high-resolution pictures. A cloud-based backup service is actually one of the best investments you can make as a phone photographer.

If you’re ready to loose the photo quality for increased storage space, then feel free to store only low-resolution images to the cloud. But if you want to keep every images in high-resolution, or prize photo quality above everything then storing images in their original format and paying the premium of a few hundred each month will totally be worth it.


Use a tripod or Steady yourself

If your images of the city skyline look a little shaky, or your photos during sunset seem a bit blur, you should learn about the photographer’s most helpful tool: the tripod. A good tripod is necessary, but for smartphone photographers it is not that important. Well, a steady hand is anytime better than a shaky hand, but none of them can beat the tripod’s skills. It provides you an impressive range of new types of photography styles like low light, long exposure, light painting, long exposure and many many other types. Small gorilla tripods are suitable for smartphone photography and easy to carry and you can use it with almost any phone.


Go remote with a shutter button

If you don’t like setting a timer and running into your frame and still get bad images most of the times then you really require a remote shutter. Remote shutter is an perfect accessory for capturing photos that requires a more steady hand, or any self-portraits. Tapping the click button while capturing, no matter how cautious you are, it will cause little vibrations that will affect your results. Smartphones like Samsung’s Galaxy Note series comes with a stylus pen that works remote shutter button, and can be kept in your hand or pocket when you’re ready to capture the image. Also for other phones remote shutters are small, cheap, and can connect to any smartphone via Bluetooth.


Or speak to Google on your Android phone to capture a image

Since all the android smartphone’s are already constantly hearing, waiting for someone to give a order, why not use it take selfies or photos too. On Android smartphones, you can ask Google Assistant to capture a image or selfie or timed photo and watch your smartphone open the camera app and capture the image on its own. Smartphones like Google’s Pixel can automatically detect the perfect moment for a image, be it a cute smile or a funny face, its AI-powered face detection features like Photobooth and Top Shot. Sadly on iOS, Siri will open the camera for you, though you will have to capture the image by yourself.


Experiment with exposure

Exposure can kill or cure any image, and the difference between them is wither you will showcase a subject in all their glory, or end up with a image that leaves them looking like dark shadow of their real self. Before capturing always tap on the screen to lock the focus on the subject you’re capturing. This is really useful when capturing people against the light or skies. It results in well lit images. Of course, if that’s the creative look like silhouettes or over exposed look you’re planning to capture the its a different thing.


Portrait Mode works better when there’s light

Using any smartphone’s “portrait mode”, which imitate the shallow depth of field found in images shot on cameras, will give you a more visually appealing image. This mode is amazing for taking portraits of people or when the background is cluttered. While everyone loves the look of a image from an good camera, but relying on the portrait mode too much can hurt more than it helps, especially if your surrounding isn’t well lit. Though there are some phones which work somewhat better in low light portrait mode but still can’t beat a camera.


OnePlus 9 Review

OnePlus has recently launched OnePlus 9 series and we have already reviewed the OnePlus 9 Pro. And after fighting over the early bugs and issues and four to five updates  later, we are here with our OnePlus 9 review. Other than the normal review about the specs and user performance of primary features of the smartphone, we will also try and  answer questions like ‘Is Hasselblad truly worth it or is it just a marketing strategy?’, ‘Is it worth spending, or no?’ and many more. If you are questioning what’s different in this new phone as compared to the its previous version or any other smartphone, you can read this before you go ahead.


OnePlus 9 key specifications
  • Qualcomm Snapdragon 888 SoC
  • Adreno 660 GPU
  • 8 GB or 12 GB RAM options
  • 128 GB or 256 GB UFS 3.1 internal storage
  • 6.55-inch Full HD+ (2400 x 1080) Fluid AMOLED display with 120 Hz refresh rate, HDR10+ and Corning Gorilla Glass
  • Cameras: 48MP with PDAF (wide) + 50MP (ultrawide) + 2 MP (Monochrome), 16MP (wide) selfie camera
  • 4,500 mAh battery with 65W fast charger
  • Android 11 with OxygenOS 11
  • 5G-compliant, Bluetooth 5.2, Dual band WiFi a/b/g/n/ac/6

Hasselblad
When OnePlus started teasing the 9 series with the image of the Moon, many people from technology industry already had an idea that they are tying up with Hasselblad for the cameras in the 9 series. Now this partnership with Hasselblad is for 3 years in which OnePlus will invest $150 million through its duration. But for this series, their statement says that, Hasselblad has helped OnePlus 9 series with only colour toning in the cameras. But in many ways, this was a very important moment for OnePlus because a lot of the brands have already tied up with other camera/lens brands and sometimes such collaborations attract more customer.

If you’ve been using many OnePlus phones over the years, then you would know that the performance of their cameras was probably the weakest part of their phones. They’ve always had amazing phone specs and performance, but as good as the other things about the smartphone were, for some reason that same level of outcome would never get translated to their cameras.


OnePlus 9 price in India
Rs. 49,999 for 8 GB RAM with 128 GB internal storage
Rs. 54,999 for 12 GB RAM with 256 GB internal storage


OnePlus 9 Look, Body and Feel
The OnePlus 9 has a similar design to its previous version, the OnePlus 8T, apart from the layout of the camera box. It has the same glass-fronted 6.55-inch Fluid AMOLED display with Corning Gorilla Glass and a glass back like the 8T. The lock button and ring/vibrate/silent toggle switch on the right and volume button on the left are in the same positions as well, all of which are in easy reach when you are normally holding the phone. It comes with the same USB-C port on the bottom with the speaker on the right to it, as well as a second speaker out of the earpiece.

The edges on the OnePlus 9 are slim, and make the phone feel thin than it is and the phone feels good to hold. Also, the phone is 0.3 mm slimmer than the 8T, but the company has opted for a glossy finish instead of matte along the edges, which definitely invites a lot of smudge marks. In order to keep it light weight (183 gm), OnePlus has given away the metal frame in the previous versions of OnePlus phones and replaced it with plastic. While it doesn’t feel like plastic to touch, it does put a doubt on the phone’s life. Having a plastic frame on the Nord is acceptable but doesn’t feel accurate on a ₹ 50,000 device.

Just like previous versions, it comes with in-display fingerprint scanner, but unlike the OnePlus 8 or 8T (it was located a little higher than regular for easier access), now they have moved it down a centimeter or two on the 9, and the user has to strain their thumb to reach it. The finger print scanner is highly responsive and works well. The SIM slot is present in the bottom on left side of charging port, and it can fit up to two nano-SIMs. The OnePlus 9 now comes with 5G. Till we have 5G in India, a user can use up to two 4G SIMs. The OnePlus 9’s screen is almost similar to the 8T. It is a 6.55-inch, Fluid AMOLED display with 2400 x 1080 pixels of resolution, 120 Hz refresh rate and brightness of 1,100 nits. The display is extremely colourful and super smooth when using it on different apps. It comes with an option to switch the refresh rate from 120 Hz to 60 Hz to save battery. It switches to 60 Hz automatically in apps that don’t support 120 Hz.

OnePlus 9 Performance and Battery
The OnePlus 9 is powered by Qualcomm’s latest Snapdragon 888 SoC, and the phone we have is of 12 GB RAM and 256 GB of UFS 3.1 internal storage. OnePlus has always opted for the fastest Qualcomm chip available in market, and no doubt that the performance is top-notch. There was no lag in day-to-day use, or in any of the normal apps or using multiple apps at same time. Gaming was halt-free and totally smooth experience at the highest settings. In popular performance benchmarks like the Geekbench 5, scores are higher than those of the OnePlus 8T. In Geekbench 5, it recorded a Single-core score of 1,112 and a Multi-core score of 3,538, which was pretty impressive with the Snapdragon 888 SoC.

The OnePlus 9 again comes with the same 4,500 mAh battery from the 8T. But the battery life can be slightly less because the Snapdragon 888 draws a bit more than the 865 chip on the OnePlus 8T. The phone runs for close to 28 hours of normal use that includes a normal amount of using social media  apps, browsing, capturing few images, hour of viewing some videos on YouTube and twenty minutes of gaming. OnePlus has maintained the 65 W Warp charger, the charging time has reduced though. It charges the phone from 0 to 50 percent in 13 minutes approximately. The OnePlus 9 goes from 0 to 100 percent in approximately 35 minutes. It doesn’t exactly powers up in 29 minutes as the company advertises, but 35 minutes is definitely faster with a 4,500 mAh battery.

OnePlus 9 Camera
OnePlus has provided three rear cameras on the OnePlus 9 unlike the four cameras in the 8T. The phone packs a 48 MP primary camera with a Sony IMX689 sensor but missing one key feature for the first time since the OnePlus 5T which is Optical Image Stabilisation (OIS). The second camera is a 50MP ultra-wide camera with a Sony IMX766 sensor. This camera can also click macro shots, a feature coming from OnePlus 7T. Everyone was in dilemma that the third camera is the telephoto which is not. The third camera present is a 2 MP monochrome camera that gives a mono filter for photos shot using the primary camera. Pro mode is where Hasselblad plays it role. It gives you better control over the ISO, White Balance, Shutter Speed, EV and Focus, if the user is more into photography they play around with the camera settings. The 16 MP front camera, with a Sony IMX471 sensor, holds its place in the OnePlus 9 like the 8T.

Image Quality

Daylight
In terms of the daylight images, the camera performed really well. The images shot on OnePlus 9 were great, crisp and sharp. The images had a slight bluish tinge though. Also the camera performed well when it came to portrait mode, the background was smoothly blurred but the edge detection wasn’t that great. The wide camera is something a landscape lover will definitely fall for as OnePlus 9 has minimal distortion while capturing widescapes. And also without a telephoto lens, the camera performs average when capturing at 2x. The image shot at wide and zoom displayed pin cushioning and barrel distortion when it comes to portrait but while capturing landscapes there was very minimal architectural distortion.


Lowlight
In terms of lowlight images, the camera performed average. The images were very well detailed. Though it was slightly under exposed in some places. But the images shot using a nightscape mode were really brilliant, the exposure was nice, it was crisp and sharp. It was bit over saturated in some places but it performed really great in lowlight conditions.


Macro Mode
Continuing this feature from the OnePlus 7T, OnePlus 9 camera and the Super Macro mode is amazing. The images shot on macro mode of the OnePlus 9 is really useful and captures the details sharply and is surely a treat to use.


Tilt shift Mode
Another new feature in the camera is the tilt shift mode, which is something unique and a bonus to capture some different perspectives. But it is not something everyone will use it frequently unless you come across the mode.

The Pro Mode
Now the Pro Mode is where the Hasselblad plays the role when you use it but really it wasn’t something which we really expected with the hype. But yes, the colours are more natural and pure when using the Pro Mode. 


Video Performance
The OnePlus 9 can shoot video in 1080p, 2160p (4K), and 4320p (8K). The main wide camera can shoot 1080p video in 30 and 60fps, 4K video in 30 and 60fps, and 8K video in 30fps. The ultra-wide camera can record 1080p video in 30 and 60fps, 4K video in 30 and 60fps, and 8K video in 30fps. All zooming is done digitally. EIS is available in 30 and 60fps modes but not for the 120fps mode. It features two slow motion modes, 1080p 240fps and 720p 480fps, which save slowed-down footage. The Super Stable mode uses the ultra-wide camera and then crops into a view of the main wide camera and then uses that video to stabilize the shot. The Nightscape mode enables night mode for video on the main camera. The Portrait mode works almost same to the feature available for photos, isolating the subject from the background using an artificial depth of field. Super Stable, Nightscape, and Portrait mode all save videos in 1080p only.

Conclusion
OnePlus 9 starts at a price of Rs. 49,999. The phone has amazing specs and is also a great performer. The smartphone comes with a powerful and high-end Snapdragon processor and runs the latest Android 11 OS. The camera has been the weaker aspect of the brand, but with the OnePlus 9 series, the company has managed to overcome that after a few updates. The OnePlus 9 provides Hasselblad camera which pulls off some stunning results in Pro Mode. A great display, nice loudspeaker and 65W fast charging are the brownie points which you will get with the smartphone. The primary highlight of the phone is its overall performance and the cameras, unfortunately, still come secondary to that.

Canon announced the launch of Three RF Mount Lenses and in progress is the New EOS R3 Full-Frame Mirrorless Camera

Canon India recently announced that Canon is currently developing the new EOS R3 full-frame mirrorless camera, which will feature a newly developed 35mm full-frame, backlit, stacked CMOS sensor and a DIGIC X image processor. The new camera is designed to provide high-level basic functionality required to meet the needs of professional and enthusiast users.


Canon also announced the launch of three brand new RF lenses: the RF100mm f/2.8L IS USM, RF400mm f/2.8L IS USM & RF600mm f/4L IS USM. The RF100mm f/2.8L IS USM is the world’s first 1, medium telephoto macro lens with a maximum shooting magnification of 1.4x. The RF400mm f/2.8L IS USM and RF600mm f/4L IS USM super telephoto lenses are native to the RF mount and provide professional and advanced amateurs with extra reach that comes with a high level of image quality, reliability and durability.


The currently-in-development EOS R3 is based on the concept of high speed, high sensitivity and high reliability. The EOS R3 will be introduced into Canon’s line-up of professional and enthusiast cameras that includes the EOS-1D X Mark III flagship DSLR camera (released in February 2020) and the EOS 5 series, including the EOS R5 full-frame mirrorless camera (released in July 2020). The EOS R3 aims to provide professional-level quality for both stills and video capture, even for moving subjects.


The EOS R3 is the first EOS series camera to be equipped with Canon’s newly developed 35mm full- frame backlit stacked CMOS sensor that makes possible high-speed readout. The camera also features a DIGIC X image processor for high-speed image processing that realises high-speed continuous shooting of up to 30 frames-per-second 1 (FPS) with AF/AE tracking when using the electronic shutter. In addition, the camera significantly reduces image warping, a common challenge with electronic shutters, and is also capable of capturing moving subjects with reduced noise in such low-light environments as indoor areas or night time scenes.


Alongside Dual Pixel CMOS AF technology by which each pixel on the image sensor possesses both image capture and phase-detect AF functionality, thus enabling high-speed, high-accuracy and wide- range AF—the EOS R3 uses an algorithm that employs deep learning technology that enables improved head and eye detection for human subjects as well as a new capability to detect subject torsos. Thanks to this enhanced performance, the cameras autofocus system provides high performance subject tracking, even during portrait photography and in scenarios with frequent subject movement such as sports. Development is also underway to enable detection of additional subject types.


In addition, the EOS R3 is Canon’s first digital camera to feature Eye Control AF 2 functionality. When shooting still images and looking through the viewfinder, this new feature enables the AF frame to adjust according to detected movement of the user’s eye, making possible smoother shooting with quick focus when transitioning between subjects. The EOS R3 answers the sophisticated needs of professionals by providing dust and water resistance developed with each iteration of the EOS-1 series, body design with integrated vertical hand-grip, reliability and ease of use, as well as compatibility with Canon’s Mobile File Transfer 3, announced alongside the EOS R3, which supports high-speed workflows.


With the goal of expanding the possibilities of imaging for users, the EOS R system will continue to expand its line-up of impressive cameras and RF lenses.

Godox AD100 Pro Review

The Godox AD100 Pro is Godox’s latest addition to their AD line-up of battery powered strobes, which means that Godox is currently offering ten different models in this product range. Godox AD100 Pro is the smallest variant, both in regards to size and power. Being an off-camera flash, it is targeted towards any photographer whether they are looking to shoot outdoors or indoors with genres like weddings, commercial, studio shots at an affordable price.


For many wedding and fashion photographers, the AD series flashes are rewarding for their excellent performance at a budget friendly price. At 100Ws and priced MRP 22,490 and street price of Rs. 19,600, it is one of the least powerful flashes in the AD series.


Before we start the review let’s talk about Godox. Everyone has been watching Godox in the market for a couple of years now and in a very short period of time the company has managed to really gain some great market strength in India. And the most important part is that they have been providing some amazing products like speedlights, strobes, led, softbox, brackets, etc. and that too at a super affordable price, which makes things even sweeter for the consumer. (Insert Godox Logo)


Look, Body and Design


The Godox AD100 Pro comes in a hard case which is easy, portable and light to carry anywhere for a shoot. The hard case includes the Godox AD100 Pro pocket flash, a Godox WB100 battery, AD-E2 Bracket, Battery Charger, USB Cable. You can carry the case whenever you go for a shoot or just put it in your camera bag and carry it around. In terms of design, Godox AD100 Pro is very compact and light weight. The body feels well-built and like any other pocket flash everything on the rear side is simple, clean and clear to understand. The light includes 2 threaded holes at the bottom which will let you directly mount it on any pole that you would need. And like most of its line-up the light includes a modelling lamp as well and for wireless compatibility the light goes with all the triggers in the Godox line-up.


Performance


Outdoor

We shot some images using a Canon 6D Mark II and the light was connected to the camera using a X1T-C trigger. Connecting the trigger to the light was very effortless as one just has to match the group and channel. The main reason behind choosing this light outdoors is because there are many times when you are shooting wedding portraits or pre-wedding images, commercial shoots with natural or artificial light in the background and you need to fill the light from the front to expose your subject properly.


The images shot outdoors using the Godox AD100 Pro were pretty impressive and the results were up to mark.


(Model – Aarya) (Instagram – @___aarya_3541__)


Indoor

For indoor shoots, we have shot some images at one of our known photographer friend’s studios (Siddhesh Sawant) (Instagram – @ssstudios26). Also the light was attached to the Godox SB-UBW80, 80 cm Octa Softbox using a Godox S2 Bracket. We shot some images on different setups like using the softbox, without softbox and modelling lamp. The images were shot using a Canon 5D Mark III and the light was connected to the camera using a X1T-C trigger.


The images shot indoors using the Godox AD100 Pro looked really nice and smooth and the light performed really well. The Godox AD100 Pro handles the heating very well too, even after using it on full power the flash was still firing. The fan inside the AD100 Pro is really helping a lot.


(Model – Rupali) (Instagram – @r00p_alley)


Conclusion

So what do we think about the GODOX AD100 Pro? In one simple word, it is really amazing. It is small, compact and lightweight, and packs a powerful punch. The best part about it though is that it is very pocket friendly. For a price of Rs. 19,600 (Street Price) the pocket flash gives a lovely performance.


And if as a beginner you are looking for a light then we would definitely recommend. The fact that it is so compact that it is very easy to carry wherever you go. Godox realised that photographers have to carry heavy bags and equipment every time and designed the AD100 Pro around that idea.


While this little one might not have the output to challenge the bigger ones in the line-up, but it certainly has the attitude to do so. It really tries to punch above its size and packs every bit of performance while trying.


For YouTube video review click here


Is Travel Photography a Good Career

Travel photography offers you a  broad range of career opportunity that can lead you ahead with endless adventures around the world. working as a photojournalist to capturing photos at the resort, there are many ways to combine your love of traveling with photography.


Travel Blogger 

Do you enjoy writing as much as clicking  pictures?   Travel blogging is not all the time  writing and photographing the visited places, or talking about the best attractions, You can switch your blog into a publication that focuses on  profession that you need, such as environmental photography or articles highlight and climate changes,  you might even want to cover destinations affected by war.

Freelance Travel Photographer. 
Since so many businesses, publications, are always in need of picture content, you can work for multiple company’s, with endless opportunities to earn good money. You’ll need a professional portfolio to promote your business and achieve the good clients; make a amazing photography portfolio that you can share with your interested clients.


Cruise Ship Photographer

 If it’s difficult to run your own, try applying for a photographer job on a cruise ship. You  may have to visiting a lot many of different ports around the world, and there’s a most of time you’ll be spending on the cruise ship itself, and also you need to make sure that you can handle the double shift or  repetitive conditions, you’ll be taking  portraits of guests on  board at the ship, food and events spot, the activities going around, and many more. all the time you’ll have to focused around what happens on the ship itself.  If you’re lucky, then you may also get chance to enjoy some adventures off the boat when it docks.

Photojournalist 

Photojournalists are some of the most well-respected professionals in the world of travel photography, and while the position is quite similar to working as a freelance journalist, you may get commissioned work from the clients or publications. most probably, you will be taking pictures that relate to the coverage issues, subject, event or place or location, that helps you to provide many information and tell a story for article, magazine, newspaper, online, or NGO.

Destination Wedding Photographer

Destination weddings are a great opportunity to travel the best and amazing places in the world, and spend your time creating unforgettable amazing images for couples on their dreamed day. As a destination wedding photographer, you can work in employment for an overseas destination wedding planning company or wedding venue, but more often than not, wedding photographers are the self-employed giving them the freedom to choose which weddings they want to do. most probably, you will be booked by  couple to take photograph’s of their wedding day; the couple  might be traveling to get married somewhere near or close to where you are based, or you may have to  travel abroad with couple to photograph their big day

Resort Photographer.

Many resorts will have photographer job available.  photographers are  always  hired during the high season, making it a great way to work your way around the world in a variety of different places as you can try finding work at the different resort during the different seasons. Most of the time the peak seasons tend to differ at different places around the world, it’s  possible to find work as an resort photographer all year round. for sure, you’ll enjoy a reliable and fixed income and many resort photographers are offered discounted staff living quarters, which can give you a feeling like you are on vacation.

Do’s & Don’ts while shooting Street Photography


Street photography can be fun, but it can also be tricky. Is it as simple as going out into the streets and taking photos? In the narrowest of views, yes. Street photography is regarded by many as an art form; it can be quite intimidating and challenging. I would venture to say that anyone who has achieved some measure of success at street photography has found it immensely rewarding.  And as a visual medium, street photography can be profoundly inspirational. 


So if you’re considering hitting the streets, here are a few basic DOs and DON’Ts to help get you started.


DO’s


Look for things, people, and places that interest you.

Look wide, life is happening all around you. Look around at  people, culture, humanity, animals, food, market, city, travel – anything which you find interesting. 


Try to find people who are busy with their work, wait for a while and try to understand the situation, story, emotions and expressions of it and that’s the perfect time when you can shoot perfect street photographs.     


Shoot wide


Why shoot in wide? When you shoot wide, you involve many stories, emotions, expressions, people, color, and drama in one frame which helps you to capture the exact moment of the subject. And widely shot photographs makes viewers feel connected to the scene.  


A wide angle lens will also allow you to get reasonably close to your subject without having to point the camera directly at them, wide lenses like 35mm and 50mm. These lenses are very small in size, which makes them very easy to carry. Hence, for  street photographers these lenses are very helpful.


Know the rules and laws of street photography


Street photography seems to be a easiest photography from the other photography skills, yes it is easy but at the same time you have to be careful of the rules and laws of street photography. 


You will inevitably encounter individuals who feel you don’t have the “right” to take their photograph; it’s all about the privacy of the people. If you get caught while clicking pictures of the people, they may take actions against you. One of the main disagreements surrounding in street photography is that of privacy.


DON’Ts:


Avoid flash, use natural light


In photography, using  a flash is great idea, but not in every area of photography. Strictly not in street photography. Street is all about taking the photographs of strangers and non-predictable things, where we don’t take permission while taking pictures. If you use flash while doing street, you may put yourself in a problem. Some people may get angry that you are taking photographs of them without their permission. 


Street photography is all about capturing the natural and exact situation, by using flash you may make people aware they are being photographed.                               


Don’t rush yourself


Patience is one of the most important virtues that street photographers can highly benefit from. At any moment, you might come across the most unique background, you should be able to be patient enough to allow the right person to enter the place for you to capture its image. 


You should consider shooting in good light; this ends up making your photographs look magical. The photographers will always take their time and wait for the right person to occupy a beautiful scene before they can capture it.


Don’t shoot without having the reason


People shoot photographs in the streets for plenty of reasons including just for pleasure, Documenting humanity, is one of the plenty reasons. You should have a concrete goal and mission in your mind of why you are capturing these photographs.


  • Text and Images – Sujay Shathananda

Tamron 70-300mm Di III RXD Lens Review in Hindi

In this video we review the Tamron 70-300mm F/4.5-6.3 lens for the Sony E-Mount. The lens is priced at Rs. 47,900 and is a more affordable and compact offering from Tamron for the Sony Mirrorless mount. Check our review and see what we thought about it.


Click on the image above to view the Review